Recently, I found myself at loose ends and wanted to try to learn something new. I decided maybe I should try some mobile development, but didn’t know where to start. I’ve developed in both Android and iOS in the past, but thought I’d give some cross-platform frameworks a try.
First up came Xamarin. It was the obvious choice for me. I develop in C# and WPF all day long at work, so I thought this would come to me most naturally. I’d also just heard about this new tool for Xamarin developers, the Xamarin Live Player. It’s a new app for Android and Apple that lets you debug on your phone easily. Unfortunately, even with this working, I found development slow. Each build would take almost a minute, and small changes sometimes wouldn’t reload to the player. I spent a few hours one day just trying to figure out why a feature wouldn’t work, and then learned it was because the live player didn’t support it!
I briefly looked at React Native. I’d heard it’s pretty good, but I don’t have much experience in web tech. I would imagine any web devs would find this pretty great though.
Finally I heard about Google’s new framework, Flutter. I’m not going to spend any time discussing how it works or why it exists, but I think it’s pretty great. Once you get the hang of building UIs, development is super fast, and reloading takes only a second or so, so if you’re a test-reload-test-reload kind of learner (like me) you’ll do great.
The only problem I’m seeing right now is that it’s so new, there’s not a lot of tutorials available. There’s plenty of hello worlds and at the other end, full projects on Github, but there’s not a lot in-between.
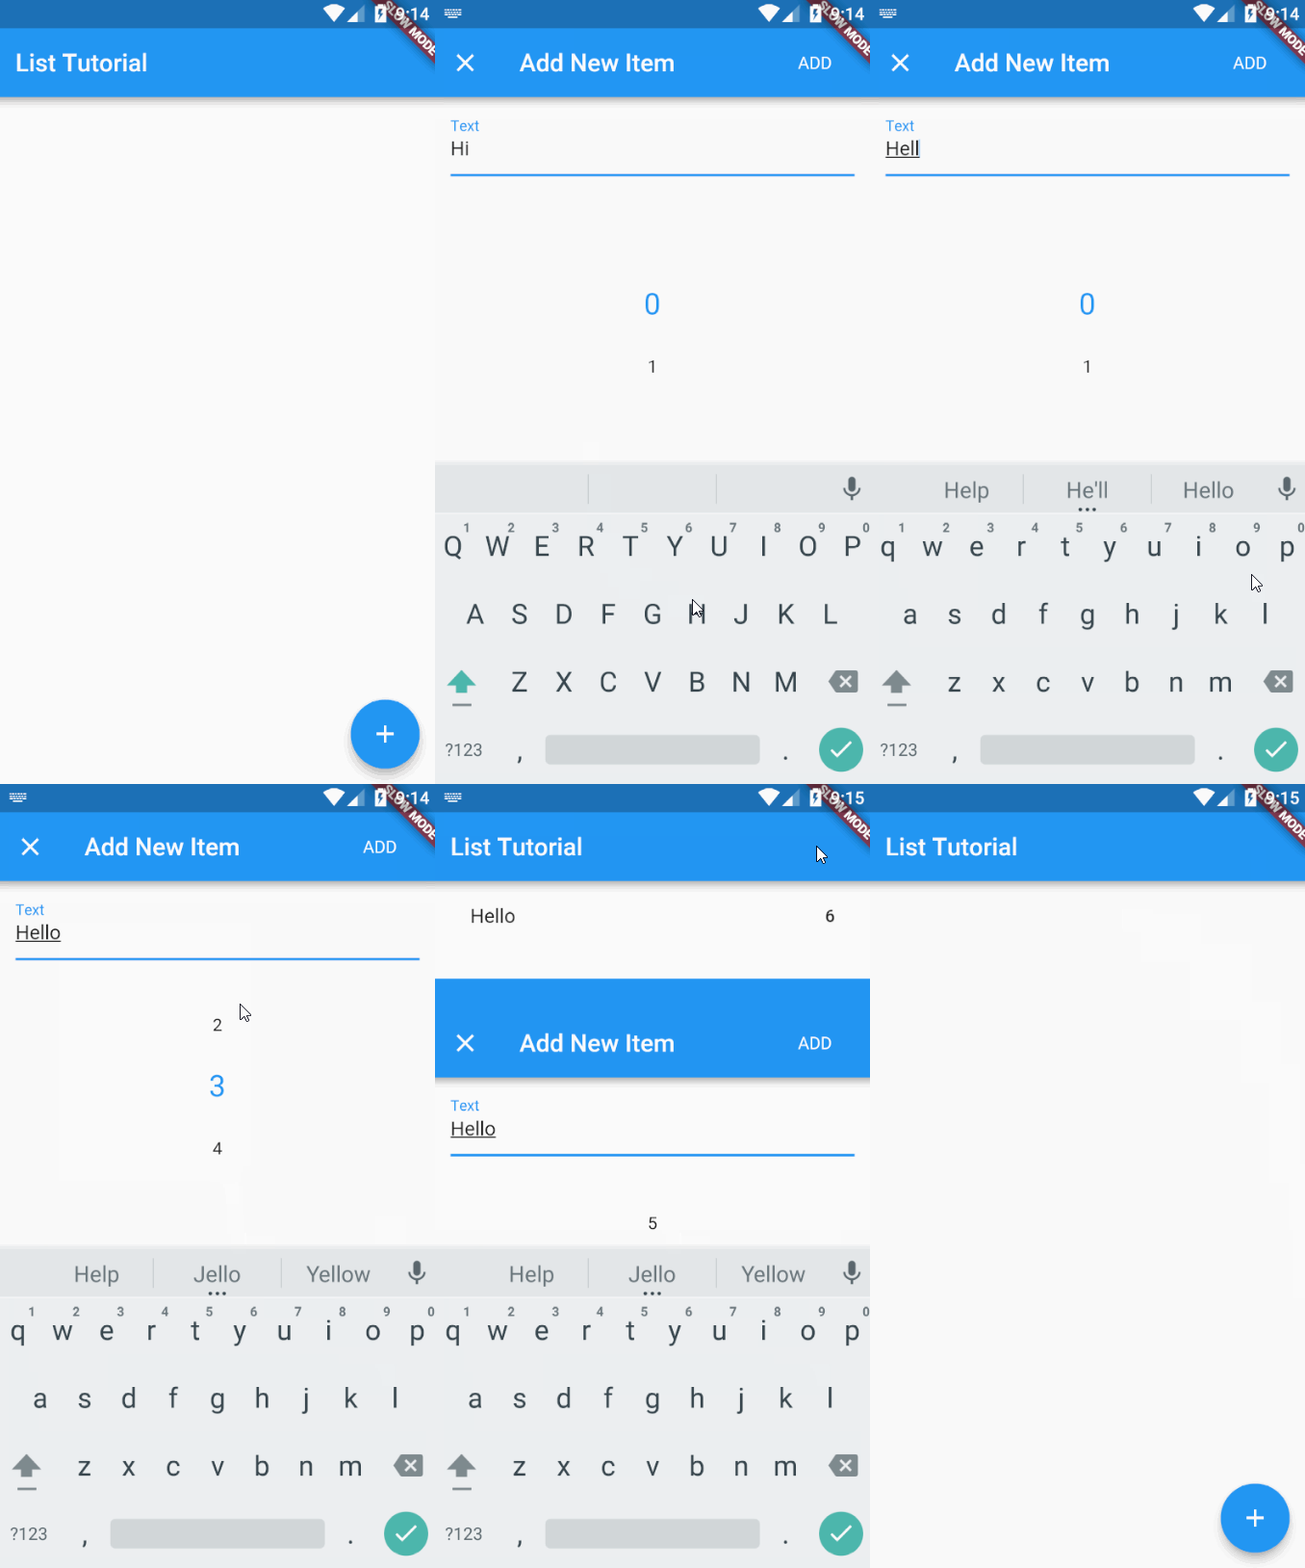
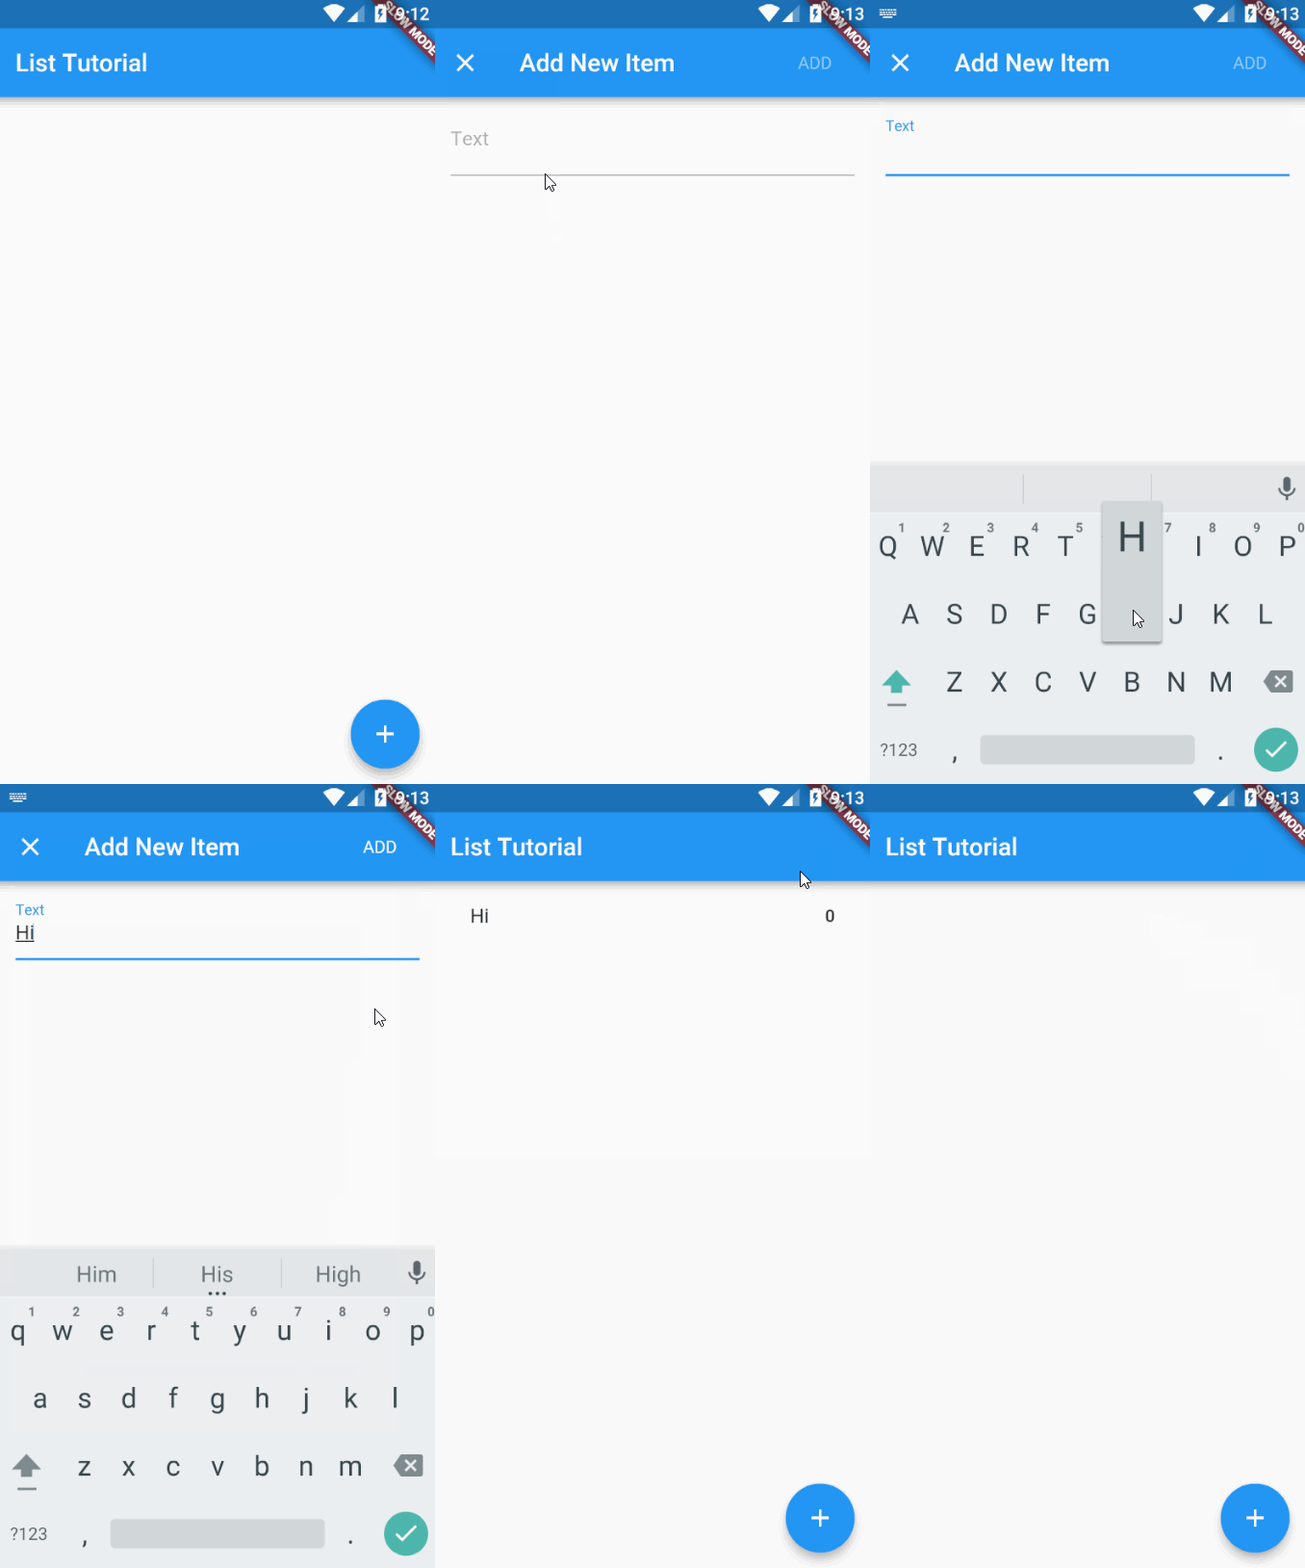
So here’s my attempt at a simple-ish example of Flutter. It’s a list, to which you can add items through a full screen dialog. Here’s a preview of what you’ll end up with, nothing too exciting, but I’m going to cover some helpful basics.

First step, make sure you’ve got your development environment setup. I’m using Android Studio, but I’ve heard it works great in Visual Studio Code too. Once that’s in place, create a new Dart Project. I called it flutter_tutorial, but it doesn’t really matter.
First of all, let’s go over some basics. Below I’m showing the main() function. This is the launching point for your app, called MyApp in this case. This sets the theme and the main entry Widget, MyHomePage. All of this should be the same as the default template classes.
void main() => runApp(new MyApp());

class MyApp extends StatelessWidget {
  @override
  Widget build(BuildContext context) {
    return new MaterialApp(
      title: 'Flutter Demo',
      theme: new ThemeData(
        primarySwatch: Colors.blue,
      ),
      home: new MyHomePage(title: 'List Tutorial'),
    );
  }
}

class MyHomePage extends StatefulWidget {
  MyHomePage({Key key, this.title}) : super(key: key);
  final String title;

  @override
  _MyHomePageState createState() => new _MyHomePageState();
}
Also, let’s quickly create a model data class, just to hold some fake data for our list.
class ModelData {
  String text;
  int number;

  ModelData(this.text, this.number);

  ModelData.empty() {
    text = "";
    number = 0;
  }
}
Next, we’ll create the state of MyHomePage that will build the UI of this home page Widget. Our UI consists of 3 things, we’ve got an AppBar, a ListView and a FloatingActionButton. Also, since we’re going to be adding and removing from this ListView dynamically, we’ll need an array in this class to hold the list items. Here’s what we’ve got at first.
class _MyHomePageState extends State<MyHomePage> {
  List _items = [];

  @override
  Widget build(BuildContext context) {
    return new Scaffold(
      appBar: new AppBar(
        title: new Text(widget.title),
      ),
      body: new ListView.builder(
        itemCount: _items.length,
        itemBuilder: (BuildContext context, int position) {
          return getRow(position);
        }),
      floatingActionButton: new FloatingActionButton(
        tooltip: 'Add Item',
        child: new Icon(Icons.add),
        onPressed: () => _openDialogAddItem(),
      ),
    );
  }
}
You should now have a couple of errors for some methods we need to add. The first one is getRow() that will return a widget representing the list item itself. This one just shows the data text on the left and the number on the right of the listview item. I’ve wrapped it all in a FlatButton so the onPressed event can be attached and it animates the tap action on the listview item nicely. As you can see, when the item is clicked, it will be removed from the list (if you’re wondering, setState() is how Flutter notifies the framework to rebuild this Widget, see here for more info).
  Widget getRow(int position) {
    return new FlatButton(
      child: new ListTile(
        title: new Text(_items[position].text),
        trailing: new Text(_items[position].number.toString()),
      ),
      onPressed: () {
        setState(() {
          _items.removeAt(position);
        });
      },
    );
  }
Secondly, you’ll need to define the function _openDialogAddItem(). This is the function that will open our dialog to select the data for the new item (we haven’t got the dialog yet, but that’s coming up). Just so we’re clear, this should be all be contained in the _MyHomePageState class.
Future _openDialogAddItem() async {
  ModelData data = await Navigator.of(context).push(
    new MaterialPageRoute<ModelData>(
      builder: (BuildContext context) {
        return new DialogAddItem();
      },
      fullscreenDialog: true));

  setState(() {
    _items.add(data);
  });
}
Futures are to dart as Tasks are to C#. They allow you to await some async code without blocking the UI. This function above breaks down to a couple of things
- We create a new MaterialPageRoute of type ModelData. This tells flutter we’re opening a new view or page and we’ll be expecting an object of type ModelData to return from it.
- Inside the route, we define the dialog, in this case DialogAddItem and define that it’s a full screen dialog.
- We await the return of this new dialog, by using Navigator.of(context).push to push this new view on top of the current one (I’ll cover how to return in the dialog).
- Finally, we take our new data object and add it to our _items collection (wrapped in a setState call to update the UI.
OK, things still won’t build yet, we need to add our DialogAddItem widget.
Just like before, we subclass Widget to create our dialog widget
class DialogAddItem extends StatefulWidget {
  @override
  _DialogAddItemState createState() => new _DialogAddItemState();
}
Then we create the State class for this widget, named _DialogAddItemState.
class _DialogAddItemState extends State<DialogAddItem> {
  bool _canSave = false;
  ModelData _data = new ModelData.empty();

  void _setCanSave(bool save) {
    if (save != _canSave)
      setState(() => _canSave = save);
  }

  @override
  Widget build(BuildContext context) {
    final ThemeData theme = Theme.of(context);

    return new Scaffold(
      appBar: new AppBar(
          title: const Text('Add New Item'),
          actions: <Widget> [
            new FlatButton(
                child: new Text('ADD', style: theme.textTheme.body1.copyWith(color: _canSave ? Colors.white : new Color.fromRGBO(255, 255, 255, 0.5))),
                onPressed: _canSave ? () { Navigator.of(context).pop(_data); } : null
            )
          ]
      ),
      body: new Form(
        child: new ListView(
          padding: const EdgeInsets.symmetric(vertical: 4.0, horizontal: 16.0),
          children: <Widget>[
            new TextField(
              decoration: const InputDecoration(
                labelText: "Text",
              ),
              onChanged: (String value) {
                _data.text = value;
                _setCanSave(value.isNotEmpty);
              },
            )
          ].toList(),
        ),
      ),
    );
  }
}
Up top, we’ve got some private variables (denoted by the _). We’ve got one for our data we’re passing back and another boolean to keep track if we can save or not. Again, to bring this back to c#, this is kind of like the CanExecute function of a relay command. I’ve created a function called _setCanSave which will update the UI if it changes state. There might be a better way to do this, but I’m still new on this.
Below that we’ve got the main build method for the widget. We’re creating an AppBar with an Add button for returning from this dialog. When we open the dialog, we set _canSave to false until the user enters some text in the TextField.
I’m just going to focus in on one section quick within the button as I think it’s pretty important, and can be a little confusing at first (it was for me at least).
new FlatButton(
    child: new Text('ADD', style: theme.textTheme.body1.copyWith(color: _canSave ? Colors.white : new Color.fromRGBO(255, 255, 255, 0.5))),
    onPressed: _canSave ? () { Navigator.of(context).pop(_data); } : null
)
This might be really normal in React type development, but I’ll cover it just in case. The FlatButton above doesn’t have a property for enabled/disabled. To disable the button, you set onPressed to null. To enable it, you give onPressed a valid callback. Because setState completely redraws the Widget when it’s called, we don’t have to set button.enabled = false or anything like that, we just set onPressed: null. To do this, we use the _canSave property in a quick ternary function.
Similar logic is being used to change the color of the button from white to light grey when it’s disabled. This is how we change the state on the button.
Another thing to point out here is that when _canSave is true, pressing this button calls Navigator.of(context).pop(_data) where data is the ModelData object stored in this state. This call pops this view or widget off the stack and puts us back to the main screen.
OK, the rest of the widget is pretty straightforward now, there’s an onChanged listener on the TextField that updates the model data and _canSave.
At this point, you should be able to hit the run button and test this out, either in the emulator or your phone. You should see something like this.

So, everything works, but I’m going to add one more thing, just for fun. You may have noticed that the ModelData class has 2 fields, but we’re only filling in one. Now we’re going to get the other and add a custom package to our project as well.
Open up pubspec.yaml and add the NumberPicker project under dependencies
numberpicker: ^0.1.0
Dependencies should now look like
dependencies:
  flutter:
    sdk: flutter

  cupertino_icons: ^0.1.0
  numberpicker: ^0.1.0
Then go back into your dialog widget and add the following line underneath the existing TextField.
new Padding(
  padding: const EdgeInsets.symmetric(vertical: 30.0, horizontal: 0.0),
  child: new NumberPicker.integer(
    initialValue: _data.number,
    minValue: 0,
    maxValue: 100,
    onChanged: (newValue) =>
      setState(() => _data.number = newValue)),
)
Again, I think this is pretty clear what’s going on here. We’ve created a number picker of type integer, with an initial value (set to the value in the _data) and it updates that value and the UI when it is changed.
Again, this wasn’t super important, just something interesting to add to the end and to show you how to add dependencies easily. It’s a lot like the gradle system in Android.
That’s it for me. Here’s the entire main.dart file in github. It’s all in one file, so if you’ve missed anything (or I’ve missed anything, this is my first longer tutorial like this) it should all be in there.
If anyone’s got any comments or suggestions on how to make this better, let me know. I’m no expert on Dart, but these were some things I spent a bunch of time googling about, so thought I’d share.