Flutter List + Dialog Example

Recently, I found myself at loose ends and wanted to try to learn something new. I decided maybe I should try some mobile development, but didn’t know where to start. I’ve developed in both Android and iOS in the past, but thought I’d give some cross-platform frameworks a try.

First up came Xamarin. It was the obvious choice for me. I develop in C# and WPF all day long at work, so I thought this would come to me most naturally. I’d also just heard about this new tool for Xamarin developers, the Xamarin Live Player. It’s a new app for Android and Apple that lets you debug on your phone easily. Unfortunately, even with this working, I found development slow. Each build would take almost a minute, and small changes sometimes wouldn’t reload to the player. I spent a few hours one day just trying to figure out why a feature wouldn’t work, and then learned it was because the live player didn’t support it!

I briefly looked at React Native. I’d heard it’s pretty good, but I don’t have much experience in web tech. I would imagine any web devs would find this pretty great though.

Finally I heard about Google’s new framework, Flutter. I’m not going to spend any time discussing how it works or why it exists, but I think it’s pretty great. Once you get the hang of building UIs, development is super fast, and reloading takes only a second or so, so if you’re a test-reload-test-reload kind of learner (like me) you’ll do great.

The only problem I’m seeing right now is that it’s so new, there’s not a lot of tutorials available. There’s plenty of hello worlds and at the other end, full projects on Github, but there’s not a lot in-between.

So here’s my attempt at a simple-ish example of Flutter. It’s a list, to which you can add items through a full screen dialog. Here’s a preview of what you’ll end up with, nothing too exciting, but I’m going to cover some helpful basics.
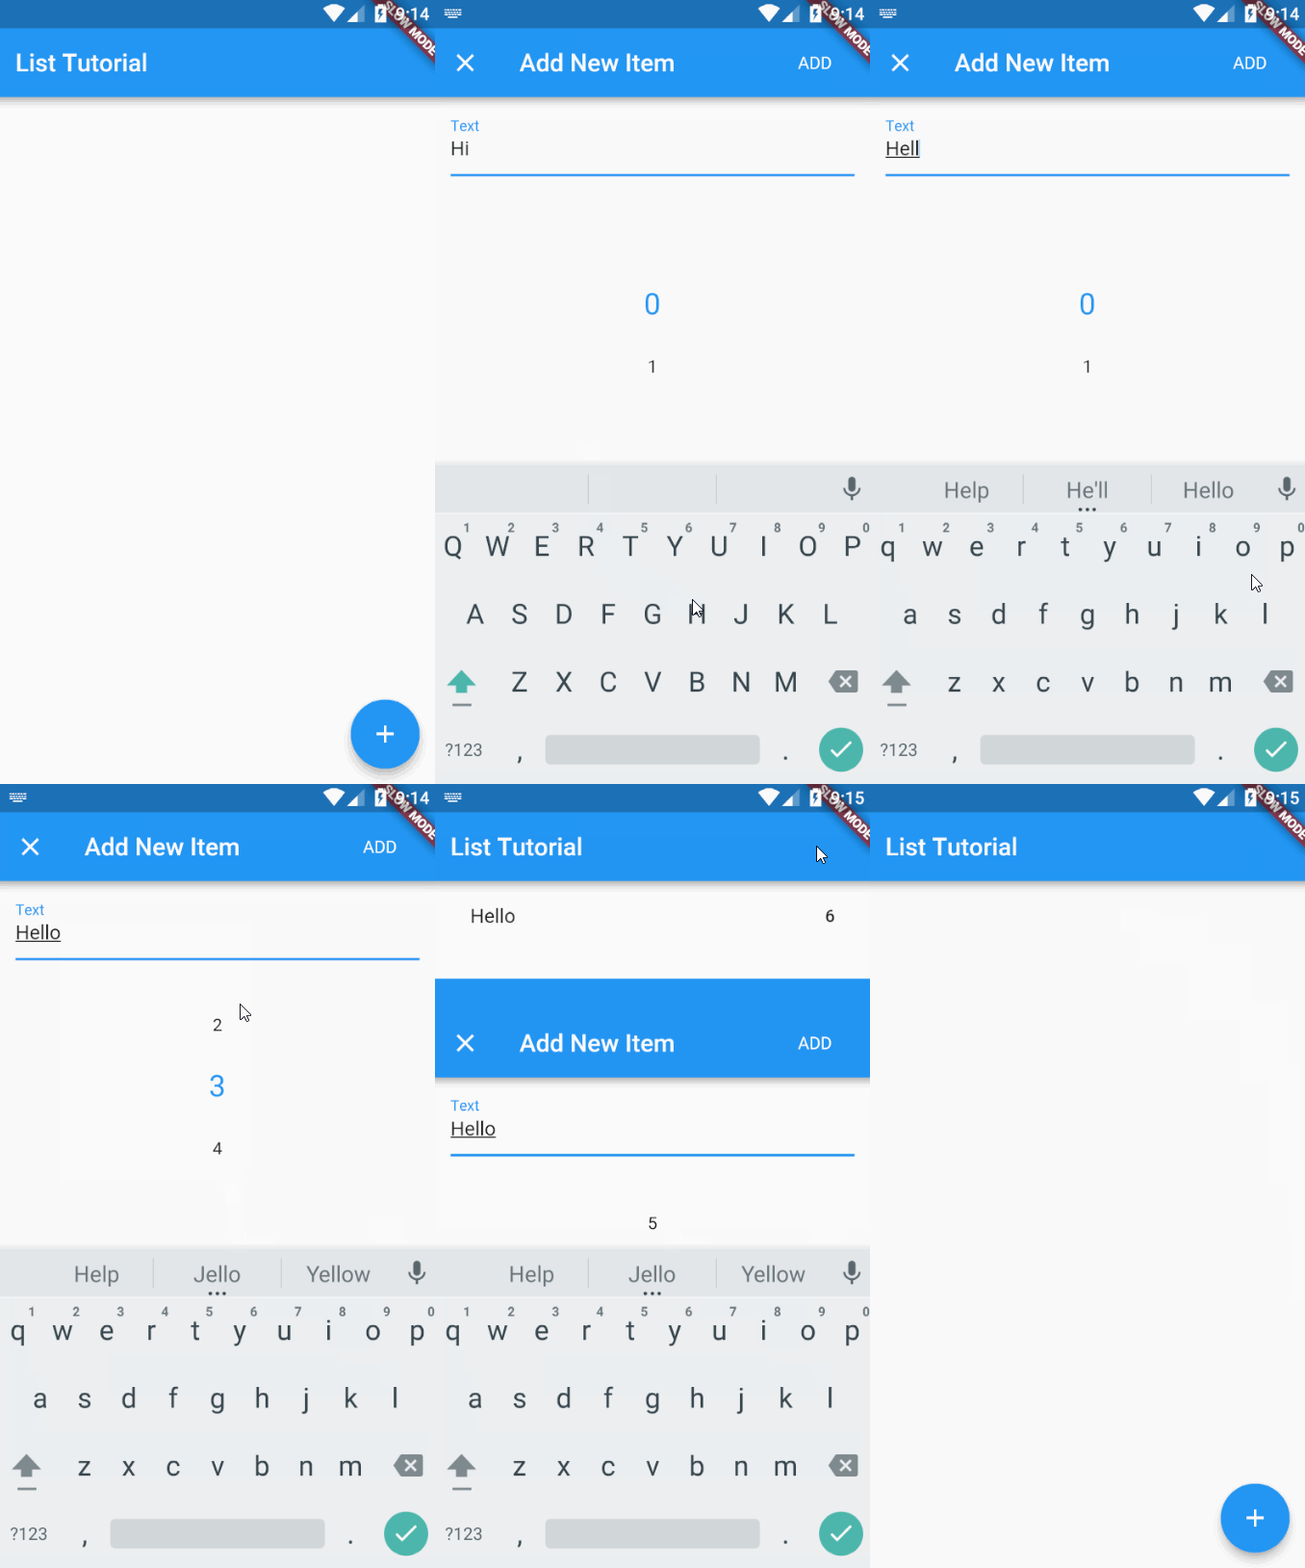
FullGif

First step, make sure you’ve got your development environment setup. I’m using Android Studio, but I’ve heard it works great in Visual Studio Code too. Once that’s in place, create a new Dart Project. I called it flutter_tutorial, but it doesn’t really matter.

First of all, let’s go over some basics. Below I’m showing the main() function. This is the launching point for your app, called MyApp in this case. This sets the theme and the main entry Widget, MyHomePage. All of this should be the same as the default template classes.

void main() => runApp(new MyApp());

class MyApp extends StatelessWidget {
  @override
  Widget build(BuildContext context) {
    return new MaterialApp(
      title: 'Flutter Demo',
      theme: new ThemeData(
        primarySwatch: Colors.blue,
      ),
      home: new MyHomePage(title: 'List Tutorial'),
    );
  }
}

class MyHomePage extends StatefulWidget {
  MyHomePage({Key key, this.title}) : super(key: key);
  final String title;

  @override
  _MyHomePageState createState() => new _MyHomePageState();
}

Also, let’s quickly create a model data class, just to hold some fake data for our list.

class ModelData {
  String text;
  int number;

  ModelData(this.text, this.number);

  ModelData.empty() {
    text = "";
    number = 0;
  }
}

Next, we’ll create the state of MyHomePage that will build the UI of this home page Widget. Our UI consists of 3 things, we’ve got an AppBar, a ListView and a FloatingActionButton. Also, since we’re going to be adding and removing from this ListView dynamically, we’ll need an array in this class to hold the list items. Here’s what we’ve got at first.

class _MyHomePageState extends State<MyHomePage> {
  List _items = [];

  @override
  Widget build(BuildContext context) {
    return new Scaffold(
      appBar: new AppBar(
        title: new Text(widget.title),
      ),
      body: new ListView.builder(
        itemCount: _items.length,
        itemBuilder: (BuildContext context, int position) {
          return getRow(position);
        }),
      floatingActionButton: new FloatingActionButton(
        tooltip: 'Add Item',
        child: new Icon(Icons.add),
        onPressed: () => _openDialogAddItem(),
      ),
    );
  }
}

You should now have a couple of errors for some methods we need to add. The first one is getRow() that will return a widget representing the list item itself. This one just shows the data text on the left and the number on the right of the listview item. I’ve wrapped it all in a FlatButton so the onPressed event can be attached and it animates the tap action on the listview item nicely. As you can see, when the item is clicked, it will be removed from the list (if you’re wondering, setState() is how Flutter notifies the framework to rebuild this Widget, see here for more info).

  Widget getRow(int position) {
    return new FlatButton(
      child: new ListTile(
        title: new Text(_items[position].text),
        trailing: new Text(_items[position].number.toString()),
      ),
      onPressed: () {
        setState(() {
          _items.removeAt(position);
        });
      },
    );
  }

Secondly, you’ll need to define the function _openDialogAddItem(). This is the function that will open our dialog to select the data for the new item (we haven’t got the dialog yet, but that’s coming up). Just so we’re clear, this should be all be contained in the _MyHomePageState class.

Future _openDialogAddItem() async {
  ModelData data = await Navigator.of(context).push(
    new MaterialPageRoute<ModelData>(
      builder: (BuildContext context) {
        return new DialogAddItem();
      },
      fullscreenDialog: true));

  setState(() {
    _items.add(data);
  });
}

Futures are to dart as Tasks are to C#. They allow you to await some async code without blocking the UI. This function above breaks down to a couple of things

  • We create a new MaterialPageRoute of type ModelData. This tells flutter we’re opening a new view or page and we’ll be expecting an object of type ModelData to return from it.
  • Inside the route, we define the dialog, in this case DialogAddItem and define that it’s a full screen dialog.
  • We await the return of this new dialog, by using Navigator.of(context).push to push this new view on top of the current one (I’ll cover how to return in the dialog).
  • Finally, we take our new data object and add it to our _items collection (wrapped in a setState call to update the UI.

OK, things still won’t build yet, we need to add our DialogAddItem widget.

Just like before, we subclass Widget to create our dialog widget

class DialogAddItem extends StatefulWidget {
  @override
  _DialogAddItemState createState() => new _DialogAddItemState();
}

Then we create the State class for this widget, named _DialogAddItemState.

class _DialogAddItemState extends State<DialogAddItem> {
  bool _canSave = false;
  ModelData _data = new ModelData.empty();

  void _setCanSave(bool save) {
    if (save != _canSave)
      setState(() => _canSave = save);
  }

  @override
  Widget build(BuildContext context) {
    final ThemeData theme = Theme.of(context);

    return new Scaffold(
      appBar: new AppBar(
          title: const Text('Add New Item'),
          actions: <Widget> [
            new FlatButton(
                child: new Text('ADD', style: theme.textTheme.body1.copyWith(color: _canSave ? Colors.white : new Color.fromRGBO(255, 255, 255, 0.5))),
                onPressed: _canSave ? () { Navigator.of(context).pop(_data); } : null
            )
          ]
      ),
      body: new Form(
        child: new ListView(
          padding: const EdgeInsets.symmetric(vertical: 4.0, horizontal: 16.0),
          children: <Widget>[
            new TextField(
              decoration: const InputDecoration(
                labelText: "Text",
              ),
              onChanged: (String value) {
                _data.text = value;
                _setCanSave(value.isNotEmpty);
              },
            )
          ].toList(),
        ),
      ),
    );
  }
}

Up top, we’ve got some private variables (denoted by the _). We’ve got one for our data we’re passing back and another boolean to keep track if we can save or not. Again, to bring this back to c#, this is kind of like the CanExecute function of a relay command. I’ve created a function called _setCanSave which will update the UI if it changes state. There might be a better way to do this, but I’m still new on this.

Below that we’ve got the main build method for the widget. We’re creating an AppBar with an Add button for returning from this dialog. When we open the dialog, we set _canSave to false until the user enters some text in the TextField.

I’m just going to focus in on one section quick within the button as I think it’s pretty important, and can be a little confusing at first (it was for me at least).

new FlatButton(
    child: new Text('ADD', style: theme.textTheme.body1.copyWith(color: _canSave ? Colors.white : new Color.fromRGBO(255, 255, 255, 0.5))),
    onPressed: _canSave ? () { Navigator.of(context).pop(_data); } : null
)

This might be really normal in React type development, but I’ll cover it just in case. The FlatButton above doesn’t have a property for enabled/disabled. To disable the button, you set onPressed to null. To enable it, you give onPressed a valid callback. Because setState completely redraws the Widget when it’s called, we don’t have to set button.enabled = false or anything like that, we just set onPressed: null. To do this, we use the _canSave property in a quick ternary function.

Similar logic is being used to change the color of the button from white to light grey when it’s disabled. This is how we change the state on the button.

Another thing to point out here is that when _canSave is true, pressing this button calls Navigator.of(context).pop(_data) where data is the ModelData object stored in this state. This call pops this view or widget off the stack and puts us back to the main screen.

OK, the rest of the widget is pretty straightforward now, there’s an onChanged listener on the TextField that updates the model data and _canSave.

At this point, you should be able to hit the run button and test this out, either in the emulator or your phone. You should see something like this.
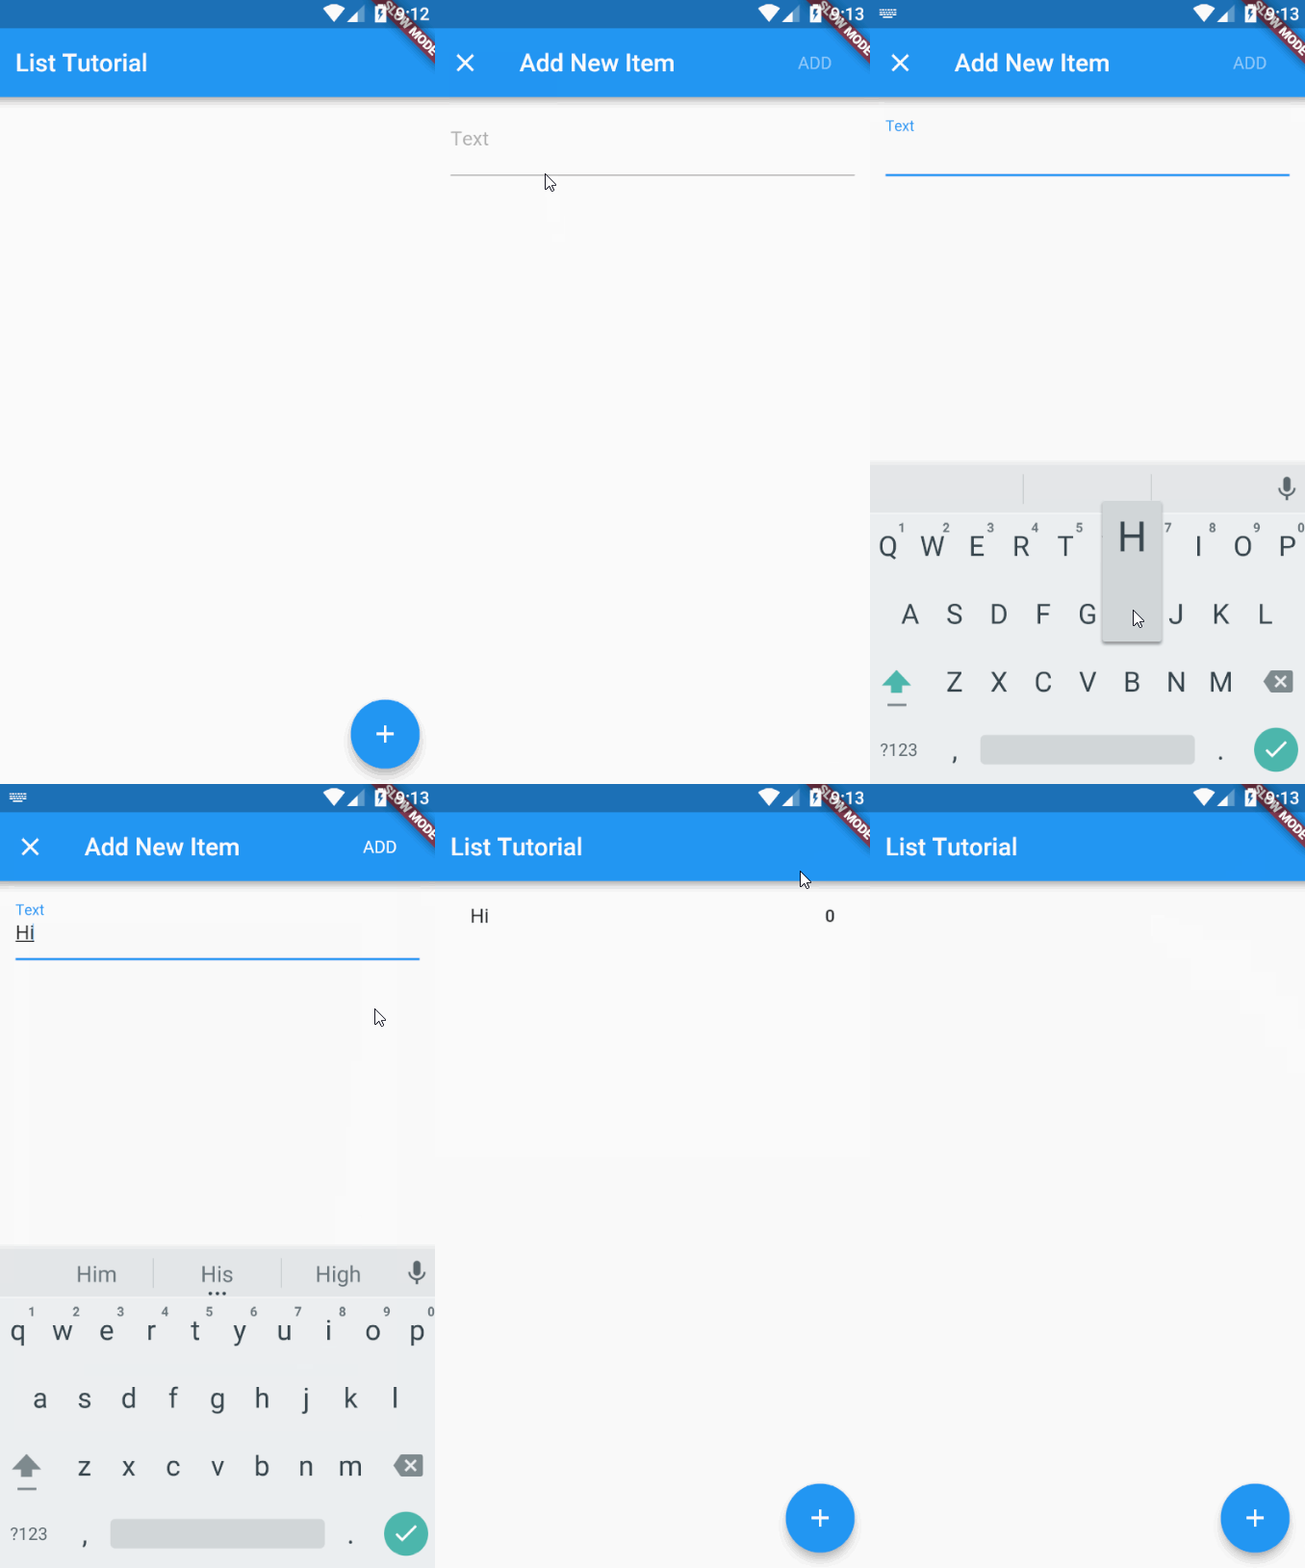
TextboxOnly

So, everything works, but I’m going to add one more thing, just for fun. You may have noticed that the ModelData class has 2 fields, but we’re only filling in one. Now we’re going to get the other and add a custom package to our project as well.

Open up pubspec.yaml and add the NumberPicker project under dependencies

numberpicker: ^0.1.0

Dependencies should now look like

dependencies:
  flutter:
    sdk: flutter

  cupertino_icons: ^0.1.0
  numberpicker: ^0.1.0

Then go back into your dialog widget and add the following line underneath the existing TextField.

new Padding(
  padding: const EdgeInsets.symmetric(vertical: 30.0, horizontal: 0.0),
  child: new NumberPicker.integer(
    initialValue: _data.number,
    minValue: 0,
    maxValue: 100,
    onChanged: (newValue) =>
      setState(() => _data.number = newValue)),
)

Again, I think this is pretty clear what’s going on here. We’ve created a number picker of type integer, with an initial value (set to the value in the _data) and it updates that value and the UI when it is changed.

Again, this wasn’t super important, just something interesting to add to the end and to show you how to add dependencies easily. It’s a lot like the gradle system in Android.

That’s it for me. Here’s the entire main.dart file in github. It’s all in one file, so if you’ve missed anything (or I’ve missed anything, this is my first longer tutorial like this) it should all be in there.

If anyone’s got any comments or suggestions on how to make this better, let me know. I’m no expert on Dart, but these were some things I spent a bunch of time googling about, so thought I’d share.

Resolution Independent WPF Apps

Working with aging hardware is tough.

For the last couple of years I’ve been working for a manufacturing company, creating a new application that would instruct the operators on the manufacturing line on how to assemble the hardware.

It needs to be really clear, and due to the amount of information they need, the UI is pretty full, with every square inch used up with “high-priority” information. The old version of this app was written in VB6, and the new in WPF.

Luckily, my managers have been on board with me buying new hardware for the manufacturing lines, so I’ve been able to use shiny new PCs with nice 1080p monitors for the operators on the line. Perhaps I’ve been spoiled by my years in software development, because I’d kind of forgotten that people have monitors that are not 1920×1080. I’m used to reading about specs for brand new laptops that are now pushing 4k.

Unfortunately, these brand new computers are not the only place I have to deploy my app. It turns out people want this to run on their desk PCs, which brings me back around to this; working with aging hardware is tough.

More recently I’ve started deploying my app in person to these plants around the country, and I’ve found I’m much more likely to find one of these

crap pc

Than one of these

nice pc

Now, you may be asking, what kind of resolution does one of these lovely PCs provide? Well, it turns out, it can range, quite significantly. It’s almost definitely not 1080p, but I’m fairly sure I’ve stumbled across an 800 x 600 monitor buried underneath an inch of dust. You can see my dilemma here.

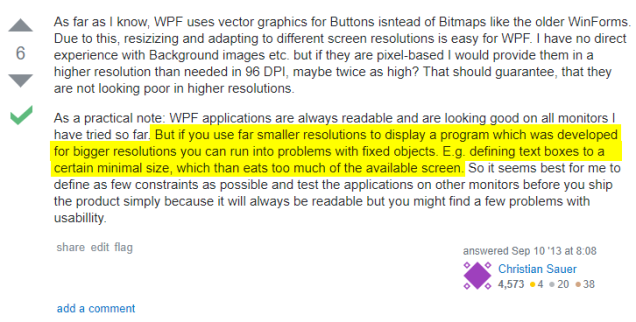
Now, this shouldn’t be a problem, Microsoft claims WPF is resolution independent. In theory, I guess it is, but I’ll let StackOverflow explain my problem.

resolution independent

So it will adapt your screen to the resolution. The problem comes when you’re using a large size 20 font for a title. In 1080p it all looks totally reasonable, but down in 800 x 600, it takes up 1/4 of the screen. It still shows everything, but not in any kind of human-usable way.

Obviously this won’t work.

To fix this problem, I created a panel called ResolutionIndependentPanel. It’s pretty simple, I basically take a ScaleTransform and scale the entire contents of the panel based on the resolution of the screen it’s being displayed on. You supply it with the resolution you designed it on, in this case it’s 1920×1080, but it could be anything, and it figures out if it needs to up or downscale to make it look pretty similar in any resolution.

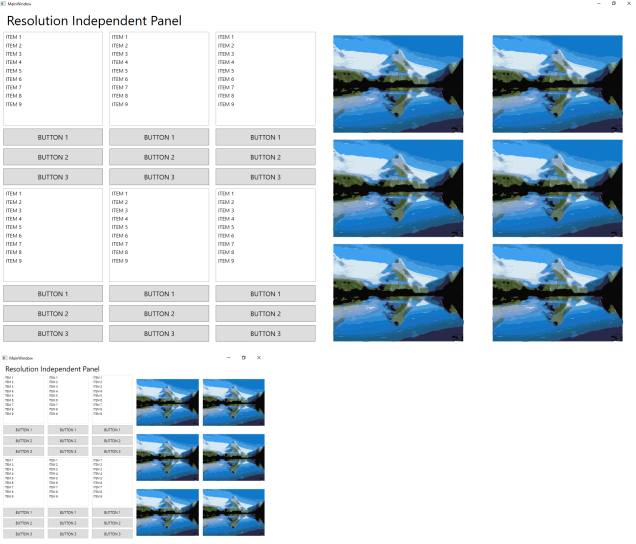
The goal is to end up with the same usable space. If your textbox took up 10% of the screen on the “designed” resolution, then it should take up that same 10% on an 800×600 monitor. Here’s a screenshot to give you an idea of what I’ve done here

panel comparison

As you can see, they have the same proportional layout and if you were to look at this on an 800×600 monitor, everything would look pretty normal.

OK, that’s basically all it does, I’m a big fan of simple fixes, and I’m going to be rolling out this one in my app this week, so I thought I’d share. It’s available in NuGet for .NET 4+, just search for ResolutionIndependentPanel.

To use it, just set up the namespace in the declarations of your UserControl or Window and wrap all your content inside of the ResolutionIndependentPanel. DesignHeight and DesignWidth have to be set to your design resolution. Piece of cake, right?

...
xmlns:rip="clr-namespace:ResolutionIndependentPanel;assembly=ResolutionIndependentPanel"
...

<rip:ResolutionIndependentPanel DesignHeight="1080"
                                DesignWidth="1920">
    <Grid>{ Your Content }</Grid>
</rip:ResolutionIndependentPanel>


Be careful with the scaling though. There are some known pitfalls. If you are a big fan of modern design, you might be using the built-in drop shadow effects. Well, unfortunately, these do something weird to the scale transforms. I think what’s happening is that WPF is taking a bitmap of the control and scaling that, instead of scaling it as a vector. Something like that, but you end up with blurry text and controls. In this case, maybe try and create your own drop shadows (I made mine out of Rectangles) to workaround it.

Links

https://github.com/chris84948/ResolutionIndependentPanel

https://www.nuget.org/packages/ResolutionIndependentPanel

P.S. If you think this is helpful, check out my other simple WPF panel fix, AirspaceFixer, it’s also available in Nuget and is based on a GitHub project.

https://github.com/chris84948/AirspaceFixer

Navigating in Xamarin

I was listening to a podcast (Merge Conflict) recently about the latest changes in Xamarin, and being a curious soul, decided it was time to at least understand what was going on. This time, the big new feature was the Xamarin Live Player which promises much faster debugging through your actual phone! Instead of being stuck using the creaky old Android emulator on Windows, or waiting 2 – 5 minutes on every build with your phone plugged in, you could now, with the power of the internet, debug wirelessly almost instantly. Obviously, I was suspicious, but this sounded like fun, so I jumped in.

Getting setup was a bit of a chore, I will admit. Most of the trouble was linked to being an early adopter. You see, Xamarin Live Player wasn’t truly released yet, just part of the latest preview of Visual Studio (v15.3 to be exact). So I had to get that, install almost all features (say goodbye to about 40GB on your hard drive, sorry ultrabook owners), and then I was basically ready to go. The final step was installing their app on my phone, and I was ready to go.

Within about 10 minutes I had the demo project running on my phone, pretty good I thought. I used the Master/Detail project template and that came with some basic navigation to boot. Everything looked great…but was it?

Being a big fan of MVVM, I really have 3 things I need in place before I can start building an application.

  1. A base class implementing INotifyPropertyChanged. Luckily this project came with one called ObservableObject.
  2. A class implementing ICommand. Again, Xamarin has us covered here, with their implementation imaginatively named Command.
  3. Some kind of ViewModel first navigation system, which appears to be missing.

So, before I get into what’s missing, I want to say that obviously, it’s not Xamarin’s job to create this stuff for us. I don’t need to be spoon-fed. Also, I get that they’re trying to set us up with a working system to get us rolling, but I don’t think this is it.

I’ve never liked View-first navigation in MVVM apps. I don’t really get how you’re supposed to be able to pass anything around, unless you’re constantly creating a View, then passing the newly created ViewModel into that in the constructor. Gross. Unfortunately, that’s what this demo app does, and it took me a few hours to figure out what everything was and what was doing what, before I realized I needed a better way. In the template you get, they’re basically doing navigation from events in the code-behind of the views (or pages in this case). Again, not a fan.

My first instinct was to do my old favorite, using DataTemplates, and just defining the View / ViewModel pairs explicitly in Xaml somewhere and being done with it. Unfortunately, it looked like this wasn’t going to fly in Xamarin.

So I did what I always do, started googling it. And it worked. I came across a library called VMFirstNav. It contained most of what I wanted, but had a little more in it than I wanted. Using their implementation, you have to make all Views implement an interface telling the library what ViewModel to link it to, and then all ViewModels have to implement another interface. It wasn’t a dealbreaker, but I wanted to see what he was actually doing. The nice thing of all that was that it would automagically figure out what View to load when you change (or push) to a new ViewModel.

This is where I want to thank CodeMillMatt. Without his code, I would have taken a lot longer to figure out how this all works. It’s good stuff dude.

OK, so what I did was take his library and just boil it down to the one important class, the NavigationService, which I named Navigator. I didn’t bother making a new github project, or putting it in Nuget, as I don’t think this is really finished. I could see a need for more features depending on what you need, but this is at least a solid starting point.

Here’s the code for the class –


using LiteSourceGo.ViewModels;
using System;
using System.Collections.Generic;
using System.Threading.Tasks;
using Xamarin.Forms;
public class Navigator
{
static Navigator instance;
public static Navigator Instance
{
get { return instance ?? (instance = new Navigator()); }
}
INavigation FormsNavigation
{
get { return Application.Current.MainPage.Navigation; }
}
readonly Dictionary<Type, Type> _viewModelViewDictionary = new Dictionary<Type, Type>();
public void Register(Type viewModelType, Type viewType)
{
if (!_viewModelViewDictionary.ContainsKey(viewModelType))
_viewModelViewDictionary.Add(viewModelType, viewType);
}
public async Task PopAsync()
{
await FormsNavigation.PopAsync(true);
}
public async Task PopModalAsync()
{
await FormsNavigation.PopModalAsync(true);
}
public async Task PopToRootAsync(bool animate)
{
await FormsNavigation.PopToRootAsync(animate);
}
public void PopTo<T>() where T : BaseViewModel
{
var pagesToRemove = new List<Page>();
for (int i = FormsNavigation.NavigationStack.Count – 1; i >= 0; i–)
{
var currentPage = FormsNavigation.NavigationStack[i] as Page;
if (currentPage?.BindingContext.GetType() == typeof(T))
break;
pagesToRemove.Add(currentPage);
}
foreach (var page in pagesToRemove)
FormsNavigation.RemovePage(page);
}
public async Task PushAsync<T>(T viewModel) where T : BaseViewModel
{
var view = InstantiateView(viewModel);
await FormsNavigation.PushAsync((Page)view);
}
public async Task PushModalAsync<T>(T viewModel) where T : BaseViewModel
{
var view = InstantiateView(viewModel);
var nv = new NavigationPage(view);
await FormsNavigation.PushModalAsync(nv);
}
Page InstantiateView<T>(T viewModel) where T : BaseViewModel
{
var viewModelType = viewModel.GetType();
var view = (Page)GetViewType(viewModelType);
view.BindingContext = viewModel;
return view;
}
private object GetViewType(Type viewModelType)
{
Type viewType = null;
if (_viewModelViewDictionary.ContainsKey(viewModelType))
{
viewType = _viewModelViewDictionary[viewModelType];
}
else
{
string viewTypeName = viewModelType.FullName.Replace("ViewModel", "View");
viewType = Type.GetType(viewTypeName);
// We don't have it already, get it now, and add it to the dictionary
_viewModelViewDictionary.Add(viewModelType, viewType);
}
return Activator.CreateInstance(viewType);
}
}

view raw

Navigator.cs

hosted with ❤ by GitHub

And here’s how to use it, once you’ve got it in place. It has a static constructor, so it’s essentially a singleton, so you don’t need to go passing it in and out of every class. It’s a little more decoupled, but I prefer it that way.


There’s 2 ways of using it.

  1. Explicitly specify all the View / View Model pairs on startup. In the past I’ve liked this method as at least you know where they are and how it works. The other advantage of this is you can name these classes whatever you want.
     private void SetupAllViewToViewModelPairs()
     {
         var nav = Navigator.Instance;
    
         nav.Register(typeof(LoggingViewModel), typeof(LoggingView));
         nav.Register(typeof(AnotherViewModel), typeof(AnotherView));
     }
    
  2. Follow a simple naming convention, and the service will automagically figure out what View to load when you tell it to load a certain View Model. The convention can be changed (it’s your code now after all). As long as you follow the scheme below, you’ll be good.
     [ClassName]View.xaml
     [ClassName]ViewModel.cs
    

OK, then to use it, you’re basically just doing the following –

var vm = new [ClassName]ViewModel();
await Navigator.Instance.PushAsync(vm);

Easy.

Bear in mind, there is no error checking on this code, so maybe tidy that up a little if you plan on using it. The only part you would need to be more careful of is probably the automatic View locating part.

Just to wrap this up. I played with Xamarin for a couple of days, but found the limitations to be too hard to work with. I’m sure there’s a lot of uses for it, but we don’t do a lot with web services at my work, so I haven’t got any excuses to work with it.

If you’ve got any comments on the code, or you’ve built anything cool in Xamarin that you’d like to show off, let me know in the comments.

Automating App Assets With Inkscape

I’ve been building a windows desktop application for the last year or so and I think it’s almost ready for release. The final step for any app, be it Windows, Android or Apple involves a lot of build optimizations and asset creation. Being lazy, I had already set up my build process to one-click, but my asset creation (icons, logos, splash screens) was still a very manual process. To make things even worse, I just had to change my application name, as it was already taken in the Windows Store, so I would now have to go through changing all my assets.

This is how I came up with the idea of automating my assets from a SVG file, using Inkscape. Now, none if this is probably ground-breaking, but I thought that I might as well share what I’ve got to hopefully make someone else’s life easier. This method will work for Android and Apple assets too, but you’re going to need to create a different batch file specific to those icons required, but the it’s essentially the same.

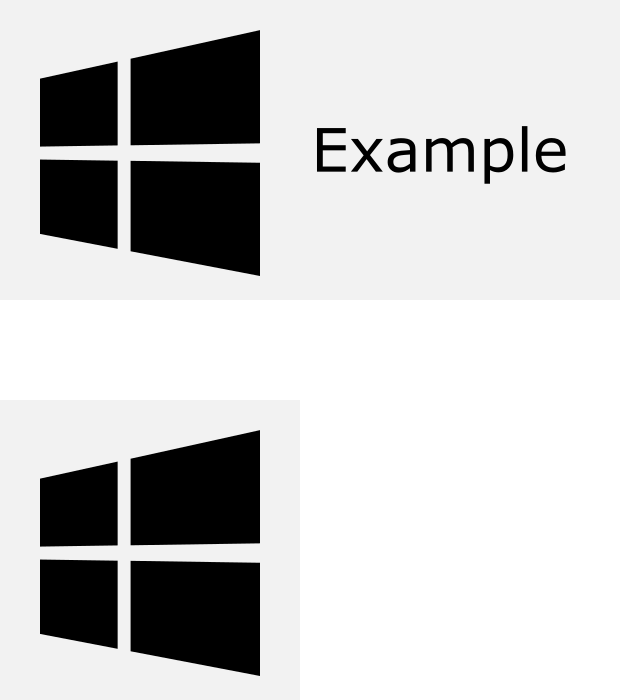
Step 1 is creating a new SVG file in Inkscape. Microsoft requires a whole bunch of different images, but they basically break down into 2 sets, a square icon and a rectangular one (with the weirdest proportion of 31:15). Since resolution doesn’t really matter in SVG files, I’d recommend you create a square icon of 150 x 150, and the rectangular at 310 x 150. That way, your images will be correct proportionally. Put whatever you want into those icons, just make sure they stay within those confines.

In my example below, I’ve shaded the background a light gray, just to make it easier to see the boundaries, but in your icon, make the background whatever you need it to be.

Blog1

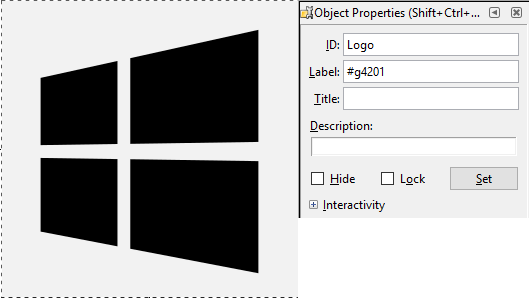
OK, now you need to group each icon and apply an ID to each of them. Highlight all the items in the square icon first, and use CTRL-G to group them as one item. Now do the same with the wide icon. Finally, right-click one of the icons and select Object Properties…. With this open, name each of your icons. In my example, I’ve simply named them Logo and LogoWide.

Blog2

OK, so that’s mostly it, now we just use the Inkscape command-line utility to export each of those icons to multiple resolutions under multiple filenames. The utility is pretty powerful, you can do a lot of different kinds of export in it, I’ve only outlined the basic one in my script below, but here’s the reference for it

Here’s the script. Basically you’ll only have to change the variables at the top of the batch script. Take this file, change to point to your installation of Inkscape, your SVG file and your logo IDs (from Inkscape) and save it as a .bat file. Then give it a shot.

SET INKSCAPE=C:\Program Files\Inkscape\Inkscape.com
SET SVG_FILE=C:\GitHub\notedui\jott.svg
SET ASSETS_PATH=C:\Github\notedui\DesktopBridge\Images
SET ID_LOGO=Logo
SET ID_LOGO_WIDE=LogoWide

REM Square 71x71 Logo
"%INKSCAPE%" --file "%SVG_FILE%" --export-png "%ASSETS_PATH%\Square71.scale-400.png" --export-id "%ID_LOGO%" --export-id-only --export-width 284
"%INKSCAPE%" --file "%SVG_FILE%" --export-png "%ASSETS_PATH%\Square71.scale-200.png" --export-id "%ID_LOGO%" --export-id-only --export-width 142
"%INKSCAPE%" --file "%SVG_FILE%" --export-png "%ASSETS_PATH%\Square71.scale-150.png" --export-id "%ID_LOGO%" --export-id-only --export-width 107
"%INKSCAPE%" --file "%SVG_FILE%" --export-png "%ASSETS_PATH%\Square71.scale-125.png" --export-id "%ID_LOGO%" --export-id-only --export-width 89
"%INKSCAPE%" --file "%SVG_FILE%" --export-png "%ASSETS_PATH%\Square71.scale-100.png" --export-id "%ID_LOGO%" --export-id-only --export-width 71

REM Square 150x150 Logo
"%INKSCAPE%" --file "%SVG_FILE%" --export-png "%ASSETS_PATH%\Square150.scale-400.png" --export-id "%ID_LOGO%" --export-id-only --export-width 600
"%INKSCAPE%" --file "%SVG_FILE%" --export-png "%ASSETS_PATH%\Square150.scale-200.png" --export-id "%ID_LOGO%" --export-id-only --export-width 300
"%INKSCAPE%" --file "%SVG_FILE%" --export-png "%ASSETS_PATH%\Square150.scale-150.png" --export-id "%ID_LOGO%" --export-id-only --export-width 225
"%INKSCAPE%" --file "%SVG_FILE%" --export-png "%ASSETS_PATH%\Square150.scale-125.png" --export-id "%ID_LOGO%" --export-id-only --export-width 188
"%INKSCAPE%" --file "%SVG_FILE%" --export-png "%ASSETS_PATH%\Square150.scale-100.png" --export-id "%ID_LOGO%" --export-id-only --export-width 150

REM Square 310x310 Logo
"%INKSCAPE%" --file "%SVG_FILE%" --export-png "%ASSETS_PATH%\Square310.scale-400.png" --export-id "%ID_LOGO%" --export-id-only --export-width 1240
"%INKSCAPE%" --file "%SVG_FILE%" --export-png "%ASSETS_PATH%\Square310.scale-200.png" --export-id "%ID_LOGO%" --export-id-only --export-width 620
"%INKSCAPE%" --file "%SVG_FILE%" --export-png "%ASSETS_PATH%\Square310.scale-150.png" --export-id "%ID_LOGO%" --export-id-only --export-width 465
"%INKSCAPE%" --file "%SVG_FILE%" --export-png "%ASSETS_PATH%\Square310.scale-125.png" --export-id "%ID_LOGO%" --export-id-only --export-width 388
"%INKSCAPE%" --file "%SVG_FILE%" --export-png "%ASSETS_PATH%\Square310.scale-100.png" --export-id "%ID_LOGO%" --export-id-only --export-width 310

REM Square 44x44 Logo
"%INKSCAPE%" --file "%SVG_FILE%" --export-png "%ASSETS_PATH%\Square44.scale-400.png" --export-id "%ID_LOGO%" --export-id-only --export-width 176
"%INKSCAPE%" --file "%SVG_FILE%" --export-png "%ASSETS_PATH%\Square44.scale-200.png" --export-id "%ID_LOGO%" --export-id-only --export-width 88
"%INKSCAPE%" --file "%SVG_FILE%" --export-png "%ASSETS_PATH%\Square44.scale-150.png" --export-id "%ID_LOGO%" --export-id-only --export-width 66
"%INKSCAPE%" --file "%SVG_FILE%" --export-png "%ASSETS_PATH%\Square44.scale-125.png" --export-id "%ID_LOGO%" --export-id-only --export-width 55
"%INKSCAPE%" --file "%SVG_FILE%" --export-png "%ASSETS_PATH%\Square44.scale-100.png" --export-id "%ID_LOGO%" --export-id-only --export-width 44

"%INKSCAPE%" --file "%SVG_FILE%" --export-png "%ASSETS_PATH%\Square44.targetsize-256.png" --export-id "%ID_LOGO%" --export-id-only --export-width 256
"%INKSCAPE%" --file "%SVG_FILE%" --export-png "%ASSETS_PATH%\Square44.targetsize-48.png" --export-id "%ID_LOGO%" --export-id-only --export-width 48
"%INKSCAPE%" --file "%SVG_FILE%" --export-png "%ASSETS_PATH%\Square44.targetsize-24.png" --export-id "%ID_LOGO%" --export-id-only --export-width 24
"%INKSCAPE%" --file "%SVG_FILE%" --export-png "%ASSETS_PATH%\Square44.targetsize-16.png" --export-id "%ID_LOGO%" --export-id-only --export-width 16

REM Store Logo
"%INKSCAPE%" --file "%SVG_FILE%" --export-png "%ASSETS_PATH%\StoreLogo.scale-400.png" --export-id "%ID_LOGO%" --export-id-only --export-width 200
"%INKSCAPE%" --file "%SVG_FILE%" --export-png "%ASSETS_PATH%\StoreLogo.scale-200.png" --export-id "%ID_LOGO%" --export-id-only --export-width 100
"%INKSCAPE%" --file "%SVG_FILE%" --export-png "%ASSETS_PATH%\StoreLogo.scale-150.png" --export-id "%ID_LOGO%" --export-id-only --export-width 75
"%INKSCAPE%" --file "%SVG_FILE%" --export-png "%ASSETS_PATH%\StoreLogo.scale-125.png" --export-id "%ID_LOGO%" --export-id-only --export-width 63
"%INKSCAPE%" --file "%SVG_FILE%" --export-png "%ASSETS_PATH%\StoreLogo.scale-100.png" --export-id "%ID_LOGO%" --export-id-only --export-width 50

REM Badge Logo
"%INKSCAPE%" --file "%SVG_FILE%" --export-png "%ASSETS_PATH%\BadgeLogo.scale-400.png" --export-id "%ID_LOGO%" --export-id-only --export-width 96
"%INKSCAPE%" --file "%SVG_FILE%" --export-png "%ASSETS_PATH%\BadgeLogo.scale-200.png" --export-id "%ID_LOGO%" --export-id-only --export-width 48
"%INKSCAPE%" --file "%SVG_FILE%" --export-png "%ASSETS_PATH%\BadgeLogo.scale-150.png" --export-id "%ID_LOGO%" --export-id-only --export-width 36
"%INKSCAPE%" --file "%SVG_FILE%" --export-png "%ASSETS_PATH%\BadgeLogo.scale-125.png" --export-id "%ID_LOGO%" --export-id-only --export-width 30
"%INKSCAPE%" --file "%SVG_FILE%" --export-png "%ASSETS_PATH%\BadgeLogo.scale-100.png" --export-id "%ID_LOGO%" --export-id-only --export-width 24


REM Wide 310x150 Logo
"%INKSCAPE%" --file "%SVG_FILE%" --export-png "%ASSETS_PATH%\Wide310.scale-400.png" --export-id "%ID_LOGO_WIDE%" --export-id-only --export-width 1240
"%INKSCAPE%" --file "%SVG_FILE%" --export-png "%ASSETS_PATH%\Wide310.scale-200.png" --export-id "%ID_LOGO_WIDE%" --export-id-only --export-width 620
"%INKSCAPE%" --file "%SVG_FILE%" --export-png "%ASSETS_PATH%\Wide310.scale-150.png" --export-id "%ID_LOGO_WIDE%" --export-id-only --export-width 465
"%INKSCAPE%" --file "%SVG_FILE%" --export-png "%ASSETS_PATH%\Wide310.scale-125.png" --export-id "%ID_LOGO_WIDE%" --export-id-only --export-width 388
"%INKSCAPE%" --file "%SVG_FILE%" --export-png "%ASSETS_PATH%\Wide310.scale-100.png" --export-id "%ID_LOGO_WIDE%" --export-id-only --export-width 310

REM Splash Screen
"%INKSCAPE%" --file "%SVG_FILE%" --export-png "%ASSETS_PATH%\SplashScreen.scale-400.png" --export-id "%ID_LOGO_WIDE%" --export-id-only --export-width 2480
"%INKSCAPE%" --file "%SVG_FILE%" --export-png "%ASSETS_PATH%\SplashScreen.scale-200.png" --export-id "%ID_LOGO_WIDE%" --export-id-only --export-width 1240
"%INKSCAPE%" --file "%SVG_FILE%" --export-png "%ASSETS_PATH%\SplashScreen.scale-150.png" --export-id "%ID_LOGO_WIDE%" --export-id-only --export-width 930
"%INKSCAPE%" --file "%SVG_FILE%" --export-png "%ASSETS_PATH%\SplashScreen.scale-125.png" --export-id "%ID_LOGO_WIDE%" --export-id-only --export-width 775
"%INKSCAPE%" --file "%SVG_FILE%" --export-png "%ASSETS_PATH%\SplashScreen.scale-100.png" --export-id "%ID_LOGO_WIDE%" --export-id-only --export-width 620

It takes about 30 second to build all those PNGs, but assuming you’re not rebuilding them every time you build the app, this is quite the time-saver. Let me know in the comments if you’ve come up with anything better.

Prototyping a puzzle game in C#

I had an idea recently for a puzzle game. Now I’ve had ideas for games in the past, but after second inspection they were either way too complicated for me to take on by myself or the idea didn’t hold up. This one, however, seemed to be a winner, so I decided to spend some time throwing together a prototype.

Over the last year I’ve taken a couple of online courses about Unity with the hope that I can pick up enough skills to be able to create my own game someday. I think this could be the perfect game to finally give it a shot. The problem for me is that I have trouble remembering the details of Unity while focusing on trying to make a real prototype of this game. Something’s going to slip, either I spend every 2 minutes googling on how to do basic things, or I spent my time focusing on the actualy game logic. In this case, the game logic was going to be complex, so I wanted 100% focus on that for now.

In my day job I work with WPF and C# all day long so I’m very comfortable with it (“very comfortable” is about as much praise as I’ll ever give myself in any skill, I was asked in an interview once to rate my skills in C# and I ended up saying 6/10, for a job I wanted). So the obvious thing for me was to throw together a prototype using what I work best with, and that’s what I’m going to talk about here.

First thing you’ll need is an MVVM library. Not to toot my own horn, but I created JustMVVM for this purpose, so feel free to use it if you want, it’s available on Nuget too.

This puzzle game idea I have could be generically described as similar to Tetris, so I have a basic grid and some blocks. Here’s the View layout, I’ve stripped out some of the less useful stuff.

<Window xmlns:ei="http://schemas.microsoft.com/expression/2010/interactions"
        xmlns:i="http://schemas.microsoft.com/expression/2010/interactivity"
        xmlns:local="clr-namespace:PuzzlePrototype"
        Title="MainWindow"
        SizeToContent="WidthAndHeight"
        WindowStartupLocation="CenterScreen"
        mc:Ignorable="d">

    <Window.DataContext>
        <local:MainWindowViewModel />
    </Window.DataContext>

    <Grid>
        <ItemsControl x:Name="GameGrid"
                      ItemsSource="{Binding Blocks}">

            <ItemsControl.ItemsPanel>
                <ItemsPanelTemplate>
                    <Canvas Width="{Binding Width}"
                            Height="{Binding Height}"
                            Background="#FF444444">
                    </Canvas>
                </ItemsPanelTemplate>
            </ItemsControl.ItemsPanel>

            <ItemsControl.ItemContainerStyle>
                <Style>
                    <Setter Property="Canvas.Bottom"
                            Value="{Binding Bottom}" />
                    <Setter Property="Canvas.Left"
                            Value="{Binding Left}" />
                </Style>
            </ItemsControl.ItemContainerStyle>

            <ItemsControl.ItemTemplate>
                <DataTemplate>
                    <Rectangle Canvas.Left="{Binding Left}"
                               Canvas.Bottom="{Binding Bottom}"
                               Width="{Binding BlockSize}"
                               Height="{Binding BlockSize}"
                               Stroke="White">
                        <Rectangle.Fill>
                            <SolidColorBrush Color="{Binding Color}" />
                        </Rectangle.Fill>
                    </Rectangle>
                </DataTemplate>
            </ItemsControl.ItemTemplate>
        </ItemsControl>
    </Grid>
</Window>

The ItemsControl just contains a collection of blocks, allowing you to bind them to the ViewModel using MVVM.

There’s also a little magic that can be added to the Canvas inside the ItemsControl.ItemsPanel called FluidMoveBehavior. If you add this to the View, you’ll automatically get animated transitions when the blocks move positions. It’s pretty much up to you if you want to make a simple blocky game, or want a little more smooth animation in it. Here’s the FluidMoveBehavior

<Canvas Width="{Binding Width}"
        Height="{Binding Height}"
        Background="#FF444444">
    <i:Interaction.Behaviors>
        <ei:FluidMoveBehavior AppliesTo="Children"
                                Duration="0:0:0.5">
            <ei:FluidMoveBehavior.EaseY>
                <SineEase EasingMode="EaseIn" />
            </ei:FluidMoveBehavior.EaseY>
            <ei:FluidMoveBehavior.EaseX>
                <SineEase EasingMode="EaseIn" />
            </ei:FluidMoveBehavior.EaseX>
        </ei:FluidMoveBehavior>
    </i:Interaction.Behaviors>
</Canvas>

The SineEase can be substituted for other easing functions.

Here’s the bare bones for the ViewModel to get things going –

public class MainWindowViewModel : MVVMBase
{
    public const int NUM_COLS = 10;
    public const int NUM_ROWS = 16;
    public const int BLOCK = 40;

    private ObservableCollection<Block> _blocks;
    public ObservableCollection<Block> Blocks
    {
        get { return _blocks; }
        set
        {
            _blocks = value;
            OnPropertyChanged();
        }
    }

    public double Width { get { return NUM_COLS * BLOCK; } }
    public double Height { get { return NUM_ROWS * BLOCK; } }

    public MainWindowViewModel()
    {
        Blocks = new ObservableCollection<Block>();
    }
}

For this prototype, it’s easiest to have all your grid size code in one place, so I’ve stored them in constants at the top. The Width and Height are bound to the view so it’ll scale appropriately. In this case, we’re creating a window 400 x 640, where each block is 40 x 40.

This is also where I ended up throwing all of my code while I was testing this out, but feel free to make it as complicated or simple as you place.

Finally, the last class required is Block.cs.

public class Block : MVVMBase
{
    public static List<Color> ColorList = new List<Color>()
    {
        (Color)ColorConverter.ConvertFromString("#860DFF"),
        (Color)ColorConverter.ConvertFromString("#3D0CE8"),
        (Color)ColorConverter.ConvertFromString("#000CFF"),
        (Color)ColorConverter.ConvertFromString("#0C50E8"),
        (Color)ColorConverter.ConvertFromString("#0D97FF")
    };

    public int BlockSize { get; set; } = MainWindowViewModel.BLOCK;

    private double _bottom;
    public double Bottom
    {
        get { return _bottom; }
        set
        {
            _bottom = value;
            OnPropertyChanged();
        }
    }

    private double _left;
    public double Left
    {
        get { return _left; }
        set
        {
            _left = value;
            OnPropertyChanged();
        }
    }

    private int _x;
    public int X
    {
        get { return _x; }
        set
        {
            _x = value;
            Left = _x * MainWindowViewModel.BLOCK;
        }
    }

    private int _y;
    public int Y
    {
        get { return _y; }
        set
        {
            _y = value;
            Bottom = _y * MainWindowViewModel.BLOCK;
        }
    }

    public Color Color { get; set; }

    private static Random _random = new Random(DateTime.Now.Millisecond);

    public Block(int x, int y)
        : this(x, y, ColorList[_random.Next(ColorList.Count)])
    { }

    public Block(int x, int y, Color color)
    {
        X = x;
        Y = y;

        Color = color;
    }

    public override string ToString()
    {
        return $"({ X }, {Y}), { Color.ToString() }";
    }
}

There’s not a lot to it really, most of this code just exists to scale your block units (0, 0) to (9, 15) to WPF pixel coordinates.

The reason I created this was to stop myself wasting any of my (little) free time navigating Unity. Hopefully some day in the future I’ll be so proficient in Unity that I won’t need this middle step, but for now it worked perfectly. If and when I’m happy with my game, I’ll make sure it all works and then focus on recreating the hard work in Unity to create the cross-platform game I’m looking for.

Hopefully some of you folks out there can also benefit from creating something in a familiar environment with the language you’re most confortable with.

All this source code is available on Github here.

Let me know what you think in the comments.

Vertical Airspace

Sometimes when you’re working in WPF, you’ll come across an issue that just stops you dead in your tracks. The kind of issue that makes you wonder how in the hell this problem can still exist in version 4+ of a product. Well, today I’m going to talk about one of those, namely Airspace.

Odds are that you haven’t heard of airspace, it’s one of those weird issues that you don’t need to know about until you need to know about it. Here’s the best simple explanation I could find about it. Basically, the problem rears its head when you’re trying to host a WinForms control inside a WPF hosting window or vice-versa. What happens is that the WinForms control has to be on the topmost layer, no matter what. Even if you try to change the z-index of another control, the WinForms control will always be on top. In reality, this means you can’t show any modal dialogs on top of any WinForms controls.

OK, OK, I know, you’re probably thinking this won’t affect me, it doesn’t really matter, I never use any WinForms controls inside my super-shiny-awesome WPF apps. Welp, maybe you’re right, but maybe, just maybe you’re going to use the WebBrowser control!

horrified

The WebBrowser control is a WinForms control (they don’t like to publicize that fact) that’s basically been wrapped for WPF.

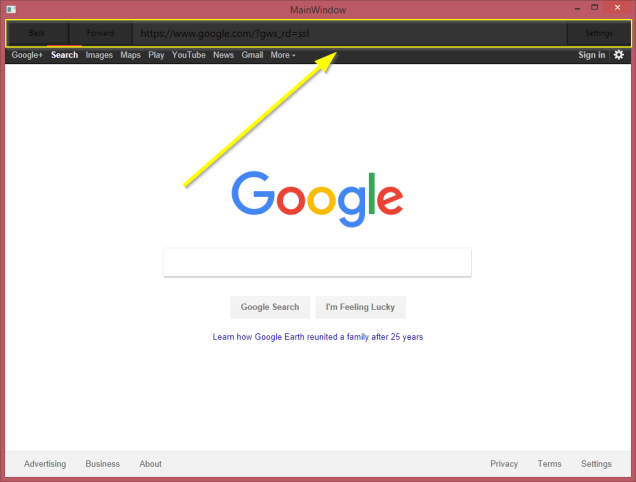
I found this out myself just a few weeks ago, when I tried to throw some Markdown preview into my application. I thought the easiest thing to do would be to just throw in a standard-issue WebBrowser and render to it. Little did I know the rabbit hole I was about to fall into. All worked great until I tried to put my dialog on top of the browser and it just didn’t. I can’t show the original example here, but I threw together a quick example of what happened.

airspacebad

The highlighted box above has a bunch of standard WPF controls, while the WebBrowser takes up most of the space. When I hit the settings button it’s supposed to show a dialog on top of the entire window and darken the background a little bit. As you can see, the dialog can’t be seen as it’s covered by the WebBrowser but you can see the top part has the darkened background.

I did a little searching on how to fix the problem, thinking it would be an easy fix, which led me here and to a false solution here which stated it would be fixed in WPF 4.5, but it never came to be. I guess the official solution is waaaaay more complicated than it looks. Some people recommended just hiding the WinForms control when showing a dialog, which, in theory would work, but is not very subtle, especially if it’s not a full-screen dialog.

I went further into the internet and came across both CEFSharp and Awesomium which both seem super powerful and useful, but also over-powered for what I needed. Add to the fact that both have a lot of JS native code calls to do the more complicated parts, and I was starting to get a little scared off.

Finally, after some thinking, I decided I should try and fix the problem that I’m actually having, that I can’t show a dialog on top, so I came up with a pretty hacky little workaround that I wanted to share with everyone.

AirspacePanel aims to fix this problem by allowing you to host any content you like inside of it, and swapping out the content for a screenshot of the content when you need to place a modal dialog on top of it. This swap is done by using the dependency property FixAirspace. Here’s an example –

xmlns:asf="clr-namespace:AirspaceFixer;assembly=AirspaceFixer"

<asf:AirspacePanel FixAirspace="{Binding FixAirspace}">
    <WebBrowser x:Name="Browser" />
</asf:AirspacePanel>

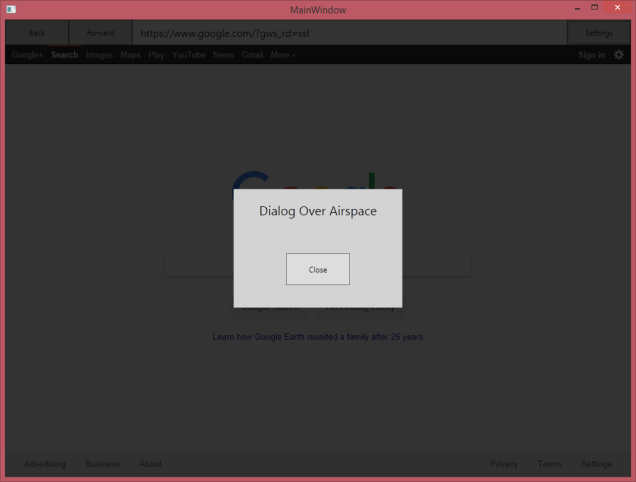
The entire project (in all it’s tiny glory) is available here on github which contains a sample project if you just want to see it. Here’s the screenshot from above all fixed with AirspacePanel.

airspacegood

You can also find it in Nuget through Visual Studio.

If anyone does give it a shot, let me know what you think. For me, it fixes a small annoyance, but I’d like to hear some other opinions.

Automate Your App Settings View in WPF


If you’re anything like me, you’re always coming up with new ideas for applications. Since WPF is my favorite UI framework, I usually end up creating it in C# and WPF. Things go great for a while, the application gets to a working state and I’m ready to preview it to the world (or a friend), but there’s still one thing I need to do – the settings screen.

The requirements for a setting screen can vary depending on the complexity of your application, but even the simplest ones usually have a handful of settings. Every time I get to this stage of the process I end up slacking off and not really finishing it properly.

So, here’s my one-stop solution to never having to create another settings screen ever again. Just implement the steps below and you’ll have a simple settings screen that binds to a class with special attributes to handle some of the finer details. Let’s jump in –

Settings Classes

First we need a simple class to contain our settings. In this example we’ll just stick with 5 settings

public class AppSettings
{
    public string LogFile { get; set; }
    public bool LogAllData { get; set; }
    public bool LightTheme { get; set; }
    public int NumberOfUsers { get; set; }
    public enum eStartupView { get; set; }
}

Now, obviously, you’re probably storing these settings somewhere, either in SQL or some kind of file, but I’ll leave those details up to you.

We want to be able to add some data to these settings so we can display a description of the setting to the user on the Settings screen. There may be some other data you’ll need to add to them to organize the settings or even hide some from the user. To do this, we’re going to create an Attribute class –

public class SettingAttribute : Attribute
{
    public string Description { get; set; }
    public bool Visible { get; set; }
}

Now we can use this attribute class to add the extra information into our settings, so our AppSettings class becomes this

public class AppSettings
{
    [Settings(Description = "Log file location")]
    public string LogFile { get; set; }

    [Settings(Description = "Do you want to log all data?")]
    public bool LogAllData { get; set; }

    [Settings(Description = "Use the light theme?")]
    public bool LightTheme { get; set; }

    [Settings(Description = "How many users are in the system?)]
    public int NumberOfUsers { get; set; }

    [Settings(Description = "What view should we show on startup?")]
    public enum eStartupView { get; set; }
}

ViewModels

Now we can create the ViewModel for the Settings View. The goal in the SettingsViewModel is to read all the properties from AppSettings using reflection and create a list of SettingsItemViewModels. Let’s start with the SettingsItemViewModel. I have it inheriting from MVVMBase which is a base class that inherits INotifyPropertyChanged. If you’re looking for an MVVM framework may I suggest JustMVVM, I wrote it, but it’s the simplest MVVM framework around, and that’s why I did it.

public class SettingsItemViewModel : MVVMBase
{
    public string Name { get; set; }
    public string Description { get; set; }
    public Type SettingType { get; set; }
    public bool IsDirty { get; set; }

    private dynamic _value;
    public dynamic Value
    {
        get { return _value; }
        set
        {
            _value = value;
            OnPropertyChanged();

            IsDirty = true;
        }
    }
}

So, this class above is a generic class that can contain any type of setting. This way we can create a list of them, one for each of the properties in AppSettings. The real key to this is using the dynamic type for the property Value. It allows us to set it generically and then check if afterwards to find out the type. IsDirty can also be useful to tell if the setting was actually changed. We’ll see that below.

Here’s the code for the SettingsViewModel which is the view model for the SettingsView UI.

public class SettingsViewModel : MVVMBase
{
    private ObservableCollection<SettingsItemViewModel> _settings;
    public ObservableCollection<SettingsItemViewModel> Settings
    {
        get { return _settings; }
        set
        {
            _settings = value;
            OnPropertyChanged();
        }
    }

    public SettingsViewModel()
    {
        AppSettings appSettings = GetAppSettings();

        Settings = GetAvailableSettings(appSettings);
    }

    public ObservableCollection<SettingsItemViewModel> GetAvailableSettings(Dictionary<string, object> settings)
    {
        var settingsView = new ObservableCollection<SettingsItemViewModel>();

        foreach (var prop in typeof(AppSettings).GetProperties())
        {
            var settingItem = new SettingsItemViewModel();

            foreach (var customAttData in prop.GetCustomAttributesData())
            {
                foreach (var item in customAttData.NamedArguments)
                {
                    var name = item.MemberInfo.Name;

                    if (name == "Description")
                        settingItem.Description = item.TypedValue.Value.ToString();
                }
            }

            settingItem.Name = prop.Name;
            settingItem.Value = settings[prop.Name];

            // Get type once value is set, value will get type dynamically
            settingItem.SettingType = settingsItem.Value.GetType();

            settingItem.IsDirty = false;

            settingsView.Add(settingItem);
        }

        return settingsView;
    }
}

OK, we’ve now got our ObservableCollection<SettingsItemViewModel> ready to go for the View. Let’s take a look at what needs to happen there.

View

OK, the View is pretty straight forward. We’re going to use an ItemsControl to contain our list of settings and we’ll use DataTemplates to figure out what view to display for each setting. Hopefully this will become more clear after you look at the code –

<Grid>
    <ItemsControl ItemsSource="{Binding Settings}">        
        <ItemsControl.ItemTemplate>
            <DataTemplate DataType="{x:Type vm:SettingsItemViewModel}">
                <ContentControl Content="{Binding }">
                    <ContentControl.Style>
                        <Style TargetType="{x:Type ContentControl}">
                            <Style.Triggers>

                                <DataTrigger Binding="{Binding SettingType}"
                                             Value="{x:Type sys:Boolean}">
                                    <Setter Property="ContentTemplate" Value="{StaticResource BooleanSettingTemplate}" />
                                </DataTrigger>

                                <DataTrigger Binding="{Binding SettingType}"
                                             Value="{x:Type sys:Int32}">
                                    <Setter Property="ContentTemplate" Value="{StaticResource IntegerSettingTemplate}" />
                                </DataTrigger>

                                <DataTrigger Binding="{Binding SettingType}"
                                             Value="{x:Type sys:Double}">
                                    <Setter Property="ContentTemplate" Value="{StaticResource DoubleSettingTemplate}" />
                                </DataTrigger>

                                <DataTrigger Binding="{Binding SettingType}"
                                             Value="{x:Type sys:String}">
                                    <Setter Property="ContentTemplate" Value="{StaticResource StringSettingTemplate}" />
                                </DataTrigger>

                                <DataTrigger Binding="{Binding SettingType,
                                                               Converter={StaticResource IsEnumeratorConverter}}"
                                             Value="True">
                                    <Setter Property="ContentTemplate" Value="{StaticResource EnumSettingTemplate}" />
                                </DataTrigger>

                            </Style.Triggers>
                        </Style>
                    </ContentControl.Style>
                </ContentControl>
            </DataTemplate>
        </ItemsControl.ItemTemplate>
    </ItemsControl>
</Grid>

The ContentControl inside the ItemsControl has a bunch of triggers that displays a different DataTemplate based on the SettingType of the SettingsItem. This allows us to have different views for each type. Obviously the view for a Boolean settings will be some kind of a checkbox, while the view for an enum would probably be a combobox.

Here are the data templates used to make this magic happen. If you don’t know too much about data templates, this is a good resources. These need to be placed in the resources section somewhere in the View. In this case I put it in the ItemsControl.Resources section.

<ItemsControl.Resources>

    <DataTemplate x:Key="BooleanSettingTemplate">
        <UniformGrid Columns="2"
                     Rows="1">
            <Label HorizontalAlignment="Right"
                   Content="{Binding Description}" />
            <CheckBox HorizontalAlignment="Left"
                      Content=""
                      IsChecked="{Binding Value}" />
        </UniformGrid>
    </DataTemplate>

    <DataTemplate x:Key="IntegerSettingTemplate">
        <UniformGrid Columns="2"
                     Rows="1">
            <Label HorizontalAlignment="Right"
                   Content="{Binding Description}" />
            <wpf:SFNumberTextBox HorizontalAlignment="Left"
                                 Interval="1"
                                 StringFormat="N0"
                                 ValueInt="{Binding Value}" />
        </UniformGrid>
    </DataTemplate>

    <DataTemplate x:Key="DoubleSettingTemplate">
        <UniformGrid Columns="2"
                     Rows="1">
            <Label HorizontalAlignment="Right"
                   Content="{Binding Description}" />
            <wpf:SFNumberTextBox HorizontalAlignment="Left"
                                 Interval="0.5"
                                 StringFormat="N1"
                                 Value="{Binding Value}" />
        </UniformGrid>
    </DataTemplate>

    <DataTemplate x:Key="StringSettingTemplate">
        <UniformGrid Columns="2"
                     Rows="1">
            <Label HorizontalAlignment="Right"
                   Content="{Binding Description}" />
            <TextBox HorizontalAlignment="Left"
                     wpfab:TextFieldExt.ClearTextButton="True"
                     Text="{Binding Value}" />
        </UniformGrid>
    </DataTemplate>

    <DataTemplate x:Key="EnumSettingTemplate">
        <UniformGrid Columns="2"
                     Rows="1">
            <Label HorizontalAlignment="Right"
                   Content="{Binding Description}" />
            <ComboBox ItemsSource="{Binding SettingType,
                                            Converter={StaticResource EnumToArrayConverter}}"
                      SelectedItem="{Binding Value}" />
        </UniformGrid>
    </DataTemplate>

</ItemsControl.Resources>

Alright. Everything’s linked up now. Obviously you can add to this if you have more complicated settings. Some settings may even be complete other classes. Either way, this setup should work pretty smoothly for you.

Converters

Here’s a couple of extra pieces that make it easier to use enums with comboboxes for settings (I’m assuming you have some). They’re just a couple of simple converters that let you bind to an enum without having to explicitly mention the enum type.

public class IsEnumeratorConverter : IValueConverter
{
    public object Convert(object value, Type targetType, object parameter, CultureInfo culture)
    {
        if (!(value is Type))
            return false;

        var type = value as Type;

        return type.IsEnum;
    }

    public object ConvertBack(object value, Type targetType, object parameter, CultureInfo culture)
    {
        throw new NotImplementedException();
    }
}


public class EnumToArrayConverter : IValueConverter
{
    public object Convert(object value, Type targetType, object parameter, CultureInfo culture)
    {
        if (!(value is Type))
            return new List<string>();

        return Enum.GetValues(value as Type);
    }

    public object ConvertBack(object value, Type targetType, object parameter, CultureInfo culture)
    {
        throw new NotImplementedException();
    }
}

That’s it. Let me know what you think in the comments. I’m always looking for feedback. I’ve been thinking of some variation of this setup for a while now, and I’m looking forward to never manually creating another settings screen ever again.

Dapper vs Rolling-Your-Own

A follow up to DataTable To List

After my last post, I got a lot of good advice on Reddit, mostly on better ways of handling my SQL data. The main point people were bringing up was using ORMs. Now, I’ve heard of the major ORMs, mostly the Entity framework I guess, but I’ve never met or spoken to anyone who’s particularly excited about. I’ve heard a lot of “Good idea, bad execution”. Now I’m not sure if that’s accurate or fair, but that’s what I’ve heard.

Most of the advice I was receiving was to use something called Dapper. After a little research I realized that Dapper was written (or at least co-written) by the same Marc Gravell that wrote FastMember (the project that sped up my reflection code). Quite a coincidence I’d say, I guess this guy knows what he’s doing in C#.

Anyway, I updated my benchmark code to compare what I was doing to using Dapper. Since Dapper actually handles the execution of the command as well as returning it to a type, I had to change my tests a little bit, so it looks like everything’s slower compared to last time, but in this test I’m timing the SQL query and converting to class.

The query I’m using in Dapper is essentially this

TestTable testData = connection.Query<TestTable>(new CommandDefinition("SELECT TOP 5000 * FROM TestTable));

If you take a look on the Github page for this project you’ll see a few other examples of how this works, but this is the simplest case.

I tested this against reading the command into a SqlDataReader and parsing (something a lot of people were recommending I do instead of converting to a DataTable).

Here’s the results –

Dapper runtimes

Now, I don’t know exactly how accurate this is, my benchmarking is pretty sloppy overall (They have more benchmarking on the project site, so feel free to dig a little deeper), but Dapper was faster, or at least essentially the same speed. Add to that the fact that it’s way easier to use than writing your own custom SqlDataReader parsing method for each stored procedure in your project and Dapper gets the win by a mile.

All I know if that I’m going to be giving a real shot on Monday when I get back to work and probably recommending it to the rest of the guys in my department.

DataTable to List

My new job has gotten me involved in a lot more SQL than I’d ever had to in the past. Now this can be interesting, but there’s a whole ton of boilerplate code that goes along with writing SQL, most of which involves converting DataTables to List.

My general opinion on DataTables is that you should immediately convert them into some equivalent C# object representing the properties you’re returning from SQL. I know this isn’t how everyone feels, especially if you’re then taking this data and converting it into some other model-type data, but for the purposes of this post, we’re going to be doing it, stick with me!

I’ve got three different ways of converting the DataTable to List and I’ve benchmarked their relative speeds for your reading pleasure. Here’s the initial setup so you can replicate it.

Creating the Table

CREATE TABLE [TestTable]
(
    [ID] [int] IDENTITY(1,1) NOT FOR REPLICATION NOT NULL,
    [Bit1] [bit] NOT NULL DEFAULT(1),
    [Bit2] [bit] NOT NULL DEFAULT(1),
    [Bit3] [bit] NOT NULL DEFAULT(1),
    [Bit4] [bit] NOT NULL DEFAULT(1),
    [Bit5] [bit] NOT NULL DEFAULT(1),
    [Bit6] [bit] NULL,
    [Bit7] [bit] NULL,
    [Bit8] [bit] NULL,
    [Bit9] [bit] NULL,
    [Bit10] [bit] NULL,
    [Float1] [float] NOT NULL DEFAULT(0.0),
    [Float2] [float] NOT NULL DEFAULT(0.0),
    [Float3] [float] NOT NULL DEFAULT(0.0),
    [Float4] [float] NOT NULL DEFAULT(0.0),
    [Float5] [float] NOT NULL DEFAULT(0.0),
    [Float6] [float] NULL,
    [Float7] [float] NULL,
    [Float8] [float] NULL,
    [Float9] [float] NULL,
    [Float10] [float] NULL,
    [Int1] [int] NOT NULL DEFAULT(0),
    [Int2] [int] NOT NULL DEFAULT(0),
    [Int3] [int] NOT NULL DEFAULT(0),
    [Int4] [int] NOT NULL DEFAULT(0),
    [Int5] [int] NOT NULL DEFAULT(0),
    [Int6] [int] NULL,
    [Int7] [int] NULL,
    [Int8] [int] NULL,
    [Int9] [int] NULL,
    [Int10] [int] NULL,
    [VarChar1] [varchar](100) NOT NULL DEFAULT('TEST'),
    [VarChar2] [varchar](100) NOT NULL DEFAULT('TEST'),
    [VarChar3] [varchar](100) NOT NULL DEFAULT('TEST'),
    [VarChar4] [varchar](100) NOT NULL DEFAULT('TEST'),
    [VarChar5] [varchar](100) NOT NULL DEFAULT('TEST'),
    [VarChar6] [varchar](100) NULL,
    [VarChar7] [varchar](100) NULL,
    [VarChar8] [varchar](100) NULL,
    [VarChar9] [varchar](100) NULL,
    [VarChar10] [varchar](100) NULL,
    PRIMARY KEY CLUSTERED 
    (
        [ID] ASC
    )
WITH 
    (
        PAD_INDEX = OFF, 
        STATISTICS_NORECOMPUTE = OFF, 
        IGNORE_DUP_KEY = OFF, 
        ALLOW_ROW_LOCKS = ON, 
        ALLOW_PAGE_LOCKS = ON
    ) ON [PRIMARY]
) 
ON [PRIMARY]

I’ve also got the test data here, so feel free to grab it. For this test, I had 5000 rows of data (the test file is 1000 records). For the record, this is all MSSQL, and probably won’t work with SQLite without a little tweaking.

To go along with this, I’ve also got a C# class with properties for each of the Columns in the SQL table, here’s that too

public class TestTable
{
    public int ID { get; set; }
    public bool Bit1 { get; set; }
    public bool Bit2 { get; set; }
    public bool Bit3 { get; set; }
    public bool Bit4 { get; set; }
    public bool Bit5 { get; set; }
    public bool? Bit6 { get; set; }
    public bool? Bit7 { get; set; }
    public bool? Bit8 { get; set; }
    public bool? Bit9 { get; set; }
    public bool? Bit10 { get; set; }
    public double Float1 { get; set; }
    public double Float2 { get; set; }
    public double Float3 { get; set; }
    public double Float4 { get; set; }
    public double Float5 { get; set; }
    public double? Float6 { get; set; }
    public double? Float7 { get; set; }
    public double? Float8 { get; set; }
    public double? Float9 { get; set; }
    public double? Float10 { get; set; }
    public int Int1 { get; set; }
    public int Int2 { get; set; }
    public int Int3 { get; set; }
    public int Int4 { get; set; }
    public int Int5 { get; set; }
    public int? Int6 { get; set; }
    public int? Int7 { get; set; }
    public int? Int8 { get; set; }
    public int? Int9 { get; set; }
    public int? Int10 { get; set; }
    public string VarChar1 { get; set; }
    public string VarChar2 { get; set; }
    public string VarChar3 { get; set; }
    public string VarChar4 { get; set; }
    public string VarChar5 { get; set; }
    public string VarChar6 { get; set; }
    public string VarChar7 { get; set; }
    public string VarChar8 { get; set; }
    public string VarChar9 { get; set; }
    public string VarChar10 { get; set; }
}

1 – ForEach

This was my first crack at it, without putting too much thought into it, this was what I thought would be the most efficient way of doing it. Turns out it’s pretty good.

public static List<TestTable> ToListForEach(DataTable dt)
{
    var data = new List<TestTable>();

    foreach (DataRow row in dt.Rows)
    {
        data.Add(new TestTable()
        {
            ID = Convert.ToInt32(row["ID"]),
            Bit1 = Convert.ToBoolean(row["Bit1"]),
            Bit2 = Convert.ToBoolean(row["Bit2"]),
            Bit3 = Convert.ToBoolean(row["Bit3"]),
            Bit4 = Convert.ToBoolean(row["Bit4"]),
            Bit5 = Convert.ToBoolean(row["Bit5"]),
            Bit6 = Convert.ToBoolean(row["Bit6"]),
            Bit7 = Convert.ToBoolean(row["Bit7"]),
            Bit8 = Convert.ToBoolean(row["Bit8"]),
            Bit9 = Convert.ToBoolean(row["Bit9"]),
            Bit10 = Convert.ToBoolean(row["Bit10"]),
            Float1 = Convert.ToDouble(row["Float1"]),
            Float2 = Convert.ToDouble(row["Float2"]),
            Float3 = Convert.ToDouble(row["Float3"]),
            Float4 = Convert.ToDouble(row["Float4"]),
            Float5 = Convert.ToDouble(row["Float5"]),
            Float6 = Convert.ToDouble(row["Float6"]),
            Float7 = Convert.ToDouble(row["Float7"]),
            Float8 = Convert.ToDouble(row["Float8"]),
            Float9 = Convert.ToDouble(row["Float9"]),
            Float10 = Convert.ToDouble(row["Float10"]),
            Int1 = Convert.ToInt32(row["Int1"]),
            Int2 = Convert.ToInt32(row["Int2"]),
            Int3 = Convert.ToInt32(row["Int3"]),
            Int4 = Convert.ToInt32(row["Int4"]),
            Int5 = Convert.ToInt32(row["Int5"]),
            Int6 = Convert.ToInt32(row["Int6"]),
            Int7 = Convert.ToInt32(row["Int7"]),
            Int8 = Convert.ToInt32(row["Int8"]),
            Int9 = Convert.ToInt32(row["Int9"]),
            Int10 = Convert.ToInt32(row["Int10"]),
            VarChar1 = row["VarChar1"].ToString(),
            VarChar2 = row["VarChar2"].ToString(),
            VarChar3 = row["VarChar3"].ToString(),
            VarChar4 = row["VarChar4"].ToString(),
            VarChar5 = row["VarChar5"].ToString(),
            VarChar6 = row["VarChar6"].ToString(),
            VarChar7 = row["VarChar7"].ToString(),
            VarChar8 = row["VarChar8"].ToString(),
            VarChar9 = row["VarChar9"].ToString(),
            VarChar10 = row["VarChar10"].ToString(),
        });
    }

    return data;
}

OK, so this is pretty good and fast. The downside is when you have actual nullable fields that can actually contain null data. In this test, all the data has been faked out, so we don’t have to deal with that, but when you do, this can slow it down considerably.

When you go from a non-null field like

Int6 = Convert.ToInt32(row["Int6"])

and make it nullable, suddenly you have to start writing your code like this –

Int6 = row.IsNull("Int6") ? new int?() : new int?(Convert.ToInt32(row["Int6"])),

or (as emn13 on reddit pointed out to me, a simpler conversion would be)

Int6 = row["Int6"] as int?

Obviously the more you have of that, the worse it gets. This leads us to

2 – LINQ

One of the guys at my work showed me this way. I’m pretty comfortable with LINQ, but I didn’t know you could get an enumerable for a DataTable, and I knew nothing about the Field structure. Here’s what it looks like

public static List<TestTable> ToListLinq(DataTable dt)
{
    return dt.AsEnumerable().Select(item => new TestTable()
    {
        ID = item.Field<int>(nameof(TestTable.ID)),
        Bit1 = item.Field<bool>(nameof(TestTable.Bit1)),
        Bit2 = item.Field<bool>(nameof(TestTable.Bit2)),
        Bit3 = item.Field<bool>(nameof(TestTable.Bit3)),
        Bit4 = item.Field<bool>(nameof(TestTable.Bit4)),
        Bit5 = item.Field<bool>(nameof(TestTable.Bit5)),
        Bit6 = item.Field<bool?>(nameof(TestTable.Bit6)),
        Bit7 = item.Field<bool?>(nameof(TestTable.Bit7)),
        Bit8 = item.Field<bool?>(nameof(TestTable.Bit8)),
        Bit9 = item.Field<bool?>(nameof(TestTable.Bit9)),
        Bit10 = item.Field<bool?>(nameof(TestTable.Bit10)),
        Float1 = item.Field<double>(nameof(TestTable.Float1)),
        Float2 = item.Field<double>(nameof(TestTable.Float2)),
        Float3 = item.Field<double>(nameof(TestTable.Float3)),
        Float4 = item.Field<double>(nameof(TestTable.Float4)),
        Float5 = item.Field<double>(nameof(TestTable.Float5)),
        Float6 = item.Field<double?>(nameof(TestTable.Float6)),
        Float7 = item.Field<double?>(nameof(TestTable.Float7)),
        Float8 = item.Field<double?>(nameof(TestTable.Float8)),
        Float9 = item.Field<double?>(nameof(TestTable.Float9)),
        Float10 = item.Field<double?>(nameof(TestTable.Float10)),
        Int1 = item.Field<int>(nameof(TestTable.Int1)),
        Int2 = item.Field<int>(nameof(TestTable.Int2)),
        Int3 = item.Field<int>(nameof(TestTable.Int3)),
        Int4 = item.Field<int>(nameof(TestTable.Int4)),
        Int5 = item.Field<int>(nameof(TestTable.Int5)),
        Int6 = item.Field<int?>(nameof(TestTable.Int6)),
        Int7 = item.Field<int?>(nameof(TestTable.Int7)),
        Int8 = item.Field<int?>(nameof(TestTable.Int8)),
        Int9 = item.Field<int?>(nameof(TestTable.Int9)),
        Int10 = item.Field<int?>(nameof(TestTable.Int10)),
        VarChar1 = item.Field<string>(nameof(TestTable.VarChar1)),
        VarChar2 = item.Field<string>(nameof(TestTable.VarChar2)),
        VarChar3 = item.Field<string>(nameof(TestTable.VarChar3)),
        VarChar4 = item.Field<string>(nameof(TestTable.VarChar4)),
        VarChar5 = item.Field<string>(nameof(TestTable.VarChar5)),
        VarChar6 = item.Field<string>(nameof(TestTable.VarChar6)),
        VarChar7 = item.Field<string>(nameof(TestTable.VarChar7)),
        VarChar8 = item.Field<string>(nameof(TestTable.VarChar8)),
        VarChar9 = item.Field<string>(nameof(TestTable.VarChar9)),
        VarChar10 = item.Field<string>(nameof(TestTable.VarChar10)),
    }).ToList();
}

So, I’m going to give you a sneak peak at the end results and let you know that this is the fastest version. If you’re looking to turn a DataTable into a List manually, this is your guy. Super fast, and handles nullable fields with ease.

3 – Reflection

Now, I know everyone gets so hung up on speed with reflection, and that, after all, is the entire reason I’m doing this, but if you’re looking for a nice generic way of converting DataTables, I think you’ll like this.

The trick to speeding this up a lot mostly relies on someone else’s smarts. The snippet below uses a project called FastMember by Marc Gravell. Here he is describing how it came to be. Now, I didn’t spend much time looking into it, I just gave it a try and it worked great, so please feel free to read more on the Github site and his blog if you’re not feeling comfortable. Luckily for us, there’s a Nuget package available for FastMember, so just include that, and use the code below, you’ll be fine.

public static List<TestTable> ToListReflection(DataTable dt)
{
    return (List<TestTable>)dt.DataTableToList<TestTable>();
}

private static readonly IDictionary<Type, IEnumerable<PropertyInfo>> _Properties =
    new Dictionary<Type, IEnumerable<PropertyInfo>>();

public static IEnumerable<T> DataTableToList<T>(this DataTable table) where T : class, new()
{
    var objType = typeof(T);
    IEnumerable<PropertyInfo> properties;

    lock (_Properties)
    {
        if (!_Properties.TryGetValue(objType, out properties))
        {
            properties = objType.GetProperties().Where(property => property.CanWrite);
            _Properties.Add(objType, properties);
        }
    }

    var list = new List<T>(table.Rows.Count);

    Parallel.ForEach<DataRow>(table.AsEnumerable().Skip(1), row => {
        var obj = new T();

        foreach (var prop in properties)
        {
            if (prop != null)
            {
                Type t = Nullable.GetUnderlyingType(prop.PropertyType) ?? prop.PropertyType;

                object propertyValue = (row[prop.Name] == null) ? null : Convert.ChangeType(row[prop.Name], t);

                var accessors = TypeAccessor.Create(objType);
                accessors[obj, prop.Name] = propertyValue;
            }
        }

        list.Add(obj);
    });

    return list;
}

This runs pretty great on its own, but by using Parallel in the ForEach we’re able to at least half our time. If you’re running a 4 core or even an 8 core machine, it can be even better, but YMMV.

So, obviously this method is a little slower, but what you lose in speed, you make up for in flexibility. You’ll never have to add or remove code when you change your stored procedure. You’ll never have to write boiler plate code like in Methods 1 and 2 ever again. Just keep in mind that this works best for small result sets.

Results

OK, here’s the final results.

DataTable to Linq runtimes

It’s pretty much as we’d expect for methods 1 and 2. If you have more nullable fields, 1 will get slower and slower, almost to the speed of method 3, so if you’re looking to do it manually, go with 2. The one thing that amazes me is how close to LINQ speeds we can get with Reflection and FastMember, so give it a try.

If you’re going with 2, here’s a SQL query that will auto generate all the class code for you. It’s pretty sweet.

OK, that’s it. Generally from now on, I think I’ll be using a combination of 2 and 3, depending on the situation. Let me know in the comments if you found anything questionable.

Searching In SQL

My current job has me working in a massive old SQL server environment a lot of the time. I’m trying to update an old VB6 application that has hundreds of stored procedures doing random pieces of the work along the way.

Since this is my first time using SQL in any meaningful way, I’m not 100% sure if this is a normal setup, but in the server there are 100s of tables and also 100s of stored procedures, oh and just for fun, there are 100s of functions of each type. This server was created a long time ago and not a lot of thought was put into the naming of anything, which leads me to having a nightmare finding anything.

Here’s an example of a couple of stored procedures I have

usp_GetSomethingImportant

usp_Get_SomethingImportant

usp_Get_Something_Important

Every time the underscore is in a different position, all the sorting moves them around, so even though these 3 stored procedures are used together they’re sorted differently!

Never mind the fact that there are multiple different types of Functions in SQL (I’m not exactly sure why or what the differences are, but they exist).

So, why am I telling you all of this, is it just to complain? Well, partly (it is ridiculous), but mostly I’m here to talk about my favorite new SQL helper utility!

It’s called SQL Hunting Dog. I honestly can’t believe this isn’t a feature just built into SQL, but here we are. Microsoft seems to have major blind spots.

Hunting Dog lets you search a sql database for anything based on the name. I know, right, soooooooo simple, but there it is. Once you find the thing you’re looking for, it can either do it’s own Select or Modify query, or it can expand all the folders in the sql explorer section to jump you right to the thing you’re looking for. That’s my favorite feature, as then you have access to all the usual SQL magic (create to, modify etc).

Also, if you’re into it (you probably are if you’re reading this blog), the source code is available on BitBucket (the link is on the website), so if there’s something you’re not completely on board with, feel free to tinker away.

If you don’t already have this, you should get it.